Do-At-Home ART
While kids and their caregivers are home during the Covid-19 pandemic, we want to help you keep busy, have fun and create ART.
The Paintbrush is committed to continuing to provide you and your kids with fun, enriching ART experiences while we remain quarantined at home.
For your reading convenience, we are dedicating this page to Do-At-Home ART PROJECTS only. All available DO-AT-HOME ART KITS can be found on their own new page! Click here to go there and see our Do-At-Home Pride ART Kit, Do-At-Home Super Hero Cape ART Kit, Father’s Day Gift Kit, Crafty Kids Do-At-Home ART Kit; Monet-in-a-Bag; Calder-in-a-Bag; Little Fingers ART Kit for for Tots #2; Basic Painting ART Kit, and more.
DO-AT-HOME ART PROJECTS
Wednesday, May 20, 2020
Must Make More May Flowers!
How many rolls of toilet paper has your family used up in
the nearly two months that we’ve all been home together? Let use some more
rolls from your recycling bin to make flowers in a vase! If you’re out of t.p.
rolls or paper towel rolls follow the alternate suggestion in Step 2.
Gather Supplies: toilet paper roll, pencil, scissors,
glue, construction paper
Step 1: Use your toilet paper roll and pencil to
trace a few circles onto flower colored paper (red, pink, yellow, purple,
orange, whatever you have!). Be sure to trace them along the edges so you don’t
waste paper when you cut them out later.
Step 2: Glue your t.p. roll vertically to the bottom
edge of your paper to make a vase. If you don’t have a t.p. roll, cut off about
1/3 of a piece of paper and roll it into the shape of a t.p. roll (cylinder)
and staple or tape it to secure it, then proceed.
Fun Tip: Use markers or crayons to add detail to your
vase before you glue it to your paper.
Step 3: How many circles did you trace? Cut one green
strip of paper for each circle you traced.
Step 4: Cut out your circles
Step 5: Glue the green stems into the t.p. roll at
different heights.
Step 6: Glue one circle to the top of each green stem.
Step 7: Add detail to your flowers by cutting out
leaves and adding smaller circles to the center of each circle.
Step 8: Clean up together.
Step 9: Send us a photo of your flowers! We want to
see the May Flowers that April Showers brought to your house!
Tuesday, May 19, 2020
Spring Trees
Yesterday we made binoculars so we could get a closer look
at what’s going on outside. Winter has turned to spring and we see that the
trees are in full bloom with leaves and flowers! Let’s make our own spring
trees for inside!
Fun Tip: If you don’t have the exact supplies don’t
get frustrated! Be creative and improvise with whatever you have. That’s what
ART is all about. There are no wrong ways to do these projects. Also, keep in
mind that we have ART supplies at The Paintbrush. Text us and let us know what
you need.
Gather Supplies: piece of paper (blue construction
paper is ideal but any paper will do), brown paper bag (or the brown paper that
comes in shipping packages), glue, one cork, 1 Q-tip, paint (green, white and
pink)
Step 1: Rip a 6” portion of your brown bag.
Step 2: Crumble the brown bag lengthwise to make a
tree trunk.
Step 3: Glue the tree truck to your paper. You may also
need to actually glue between the crinkles, gluing the paper to itself.
Step 4: Dip the cork into green paint and stamp all
over the top of the tree trunk and the paper to make the leaves of the tree.
Step 5: Using one end of your Q-tip, paint pink dots
randomly around your leaves.
Step 6: Using the other end of your Q-tip, paint
white dots as close to (or partially overlapping) the pink dots. These are
flowers.
Step 7: Clean up together
Step 8: Send us a photo of your beautiful Spring
Tree.
Monday, May 18, 2020
Bird-Watching Binoculars
We can’t go out but we can look out the window! What do you
see out there? Let’s make a pair of binoculars so we can take a closer look!
Gather Supplies: two toilet paper rolls, string or
yarn, staples or tape, hole punch, paint or markers or crayons, embellishments
(stickers, sequins, etc. optional)
Fun Tip: If you don’t have the exact supplies don’t
get frustrated! Be creative and improvise with whatever you have. That’s what
ART is all about. There are no wrong ways to do these projects. Also, keep in
mind that we have ART supplies at The Paintbrush. Text us and let us know what
you need.
Step 1: Staple your toilet paper rolls together so
they are next to each other. You’ll have to insert the stapler into both holes
and squeeze. Staple both ends. (We don’t
like to use staples in our ART work but this project will be more fun if we
don’t have to wait for glue to dry.) OR … tape the rolls together.
Step 2: Use your hole punch to punch one hole on the
outside of one end of both rolls.
Step 3: Tie one end of your string through each hole,
so you can comfortably hang your binoculars around your neck.
Step 4: Use your paint, markers and/or crayons to
color and design your binoculars.
Step 5: Embellish with stickers, sequins etc. if you
want to.
Step 6: Clean up together.
Step 7: Hold your binoculars up to your eyes and look
out the window. What do you see? Are there trees outside? Birds? Cars?
Step 8: Send us a photo of yourself looking out your
window. Tell us what you see!
Thursday, 5/14/2020
More May Flowers
At
Paint&Play we make a different May Flowers project on our
Following-Directions Table every week of May. This is a new one, just for you!
Gather
Supplies: a piece of paper (or a piece of cardboard, such as a cereal
box), newspaper (or magazine pages, or even discarded bills or other mail from
your recycling bin), scissors, glue, markers or crayons, embellishments (what
do you have? glitter, gems, sequins, buttons?)
Step 1: Cut
flower petals from your newspaper. They don’t have to be prefect nor do they
have to be all the same size. Make at least 5 per flower.
Fun
Tip: Draw your petals with a pencil to make it easier to cut them
out.
Step 2:
Glue your flower petals to your paper.
Step 3: Use
markers, crayons and your embellishments to decorate and embellish your flower
petals.
Step 4: Use
crayons and/or markers to draw stems, flower petals and grass.
Step 5: Clean
up together
Step 7: Text
or email us a photo of your work and/or post on social media and tag
@thepaintbrush_artstudio THANKS!
Tuesday, 5/12/2020
Mini Airplanes
Gather Supplies: toilet paper rolls, cardboard box
pieces, scissors, glue, paint or markers (or crayons)
Step 1: Have your grown-up cut a hole in the side of your toilet paper roll.
Fun Tip: Pinch the t.p. roll slightly to cut.
Step 2: Cut out airplane wings from your cardboard
(see photo)
Step 3: Use paint, markers, crayons and/or stickers
to decorate your plane pieces.
Step 4: Glue the t.p. roll to the cardboard wings
Step 5: Let dry
Step 6: Clean up together
Step 7: Insert minifigure into hole and take him for
a ride!
Monday, 5/11/2020
Puffy Sidewalk Chalk
Gather Ingredients: 1 cup flour, 1 cup water, 1 TBSP
dish soap, 5-10 drops of food coloring or washable paint, large bowl, spoon, squeeze
bottle (what’s in your recycling bin? Empty ketchup, mustard, or honey bear
bottle will do. If you don’t have these, use a Ziploc bag – which you will fill
and then cut off one tip, like a pastry bag)
Step 1: Stir together flower and water in large bowl until
there are no lumps.
Step 2: Stir in dish soap.
Step 3: Add drops of food coloring until the mixture has
the color intensity you want
.
Step 4: Pour into squirt bottle or spoon into a Ziploc
bag (be sure to zip closed, then cut off one tip – the more you cut off the
larger the hole will be).
Step 5: If you want more than one color, follow Steps
1-4 for as many more colors as you’d like to make.
Step 6: Clean up together
Step 7: Go outside and try out your chalk (be sure to
put on your mask!)
Fun Tip: Use all of your chalk TODAY. It will EXPLODE
if you leave it sealed for another day.
Step 8: Take a photo to share with us!
Thursday, 5/7/2020
Mother’s Day May Flowers 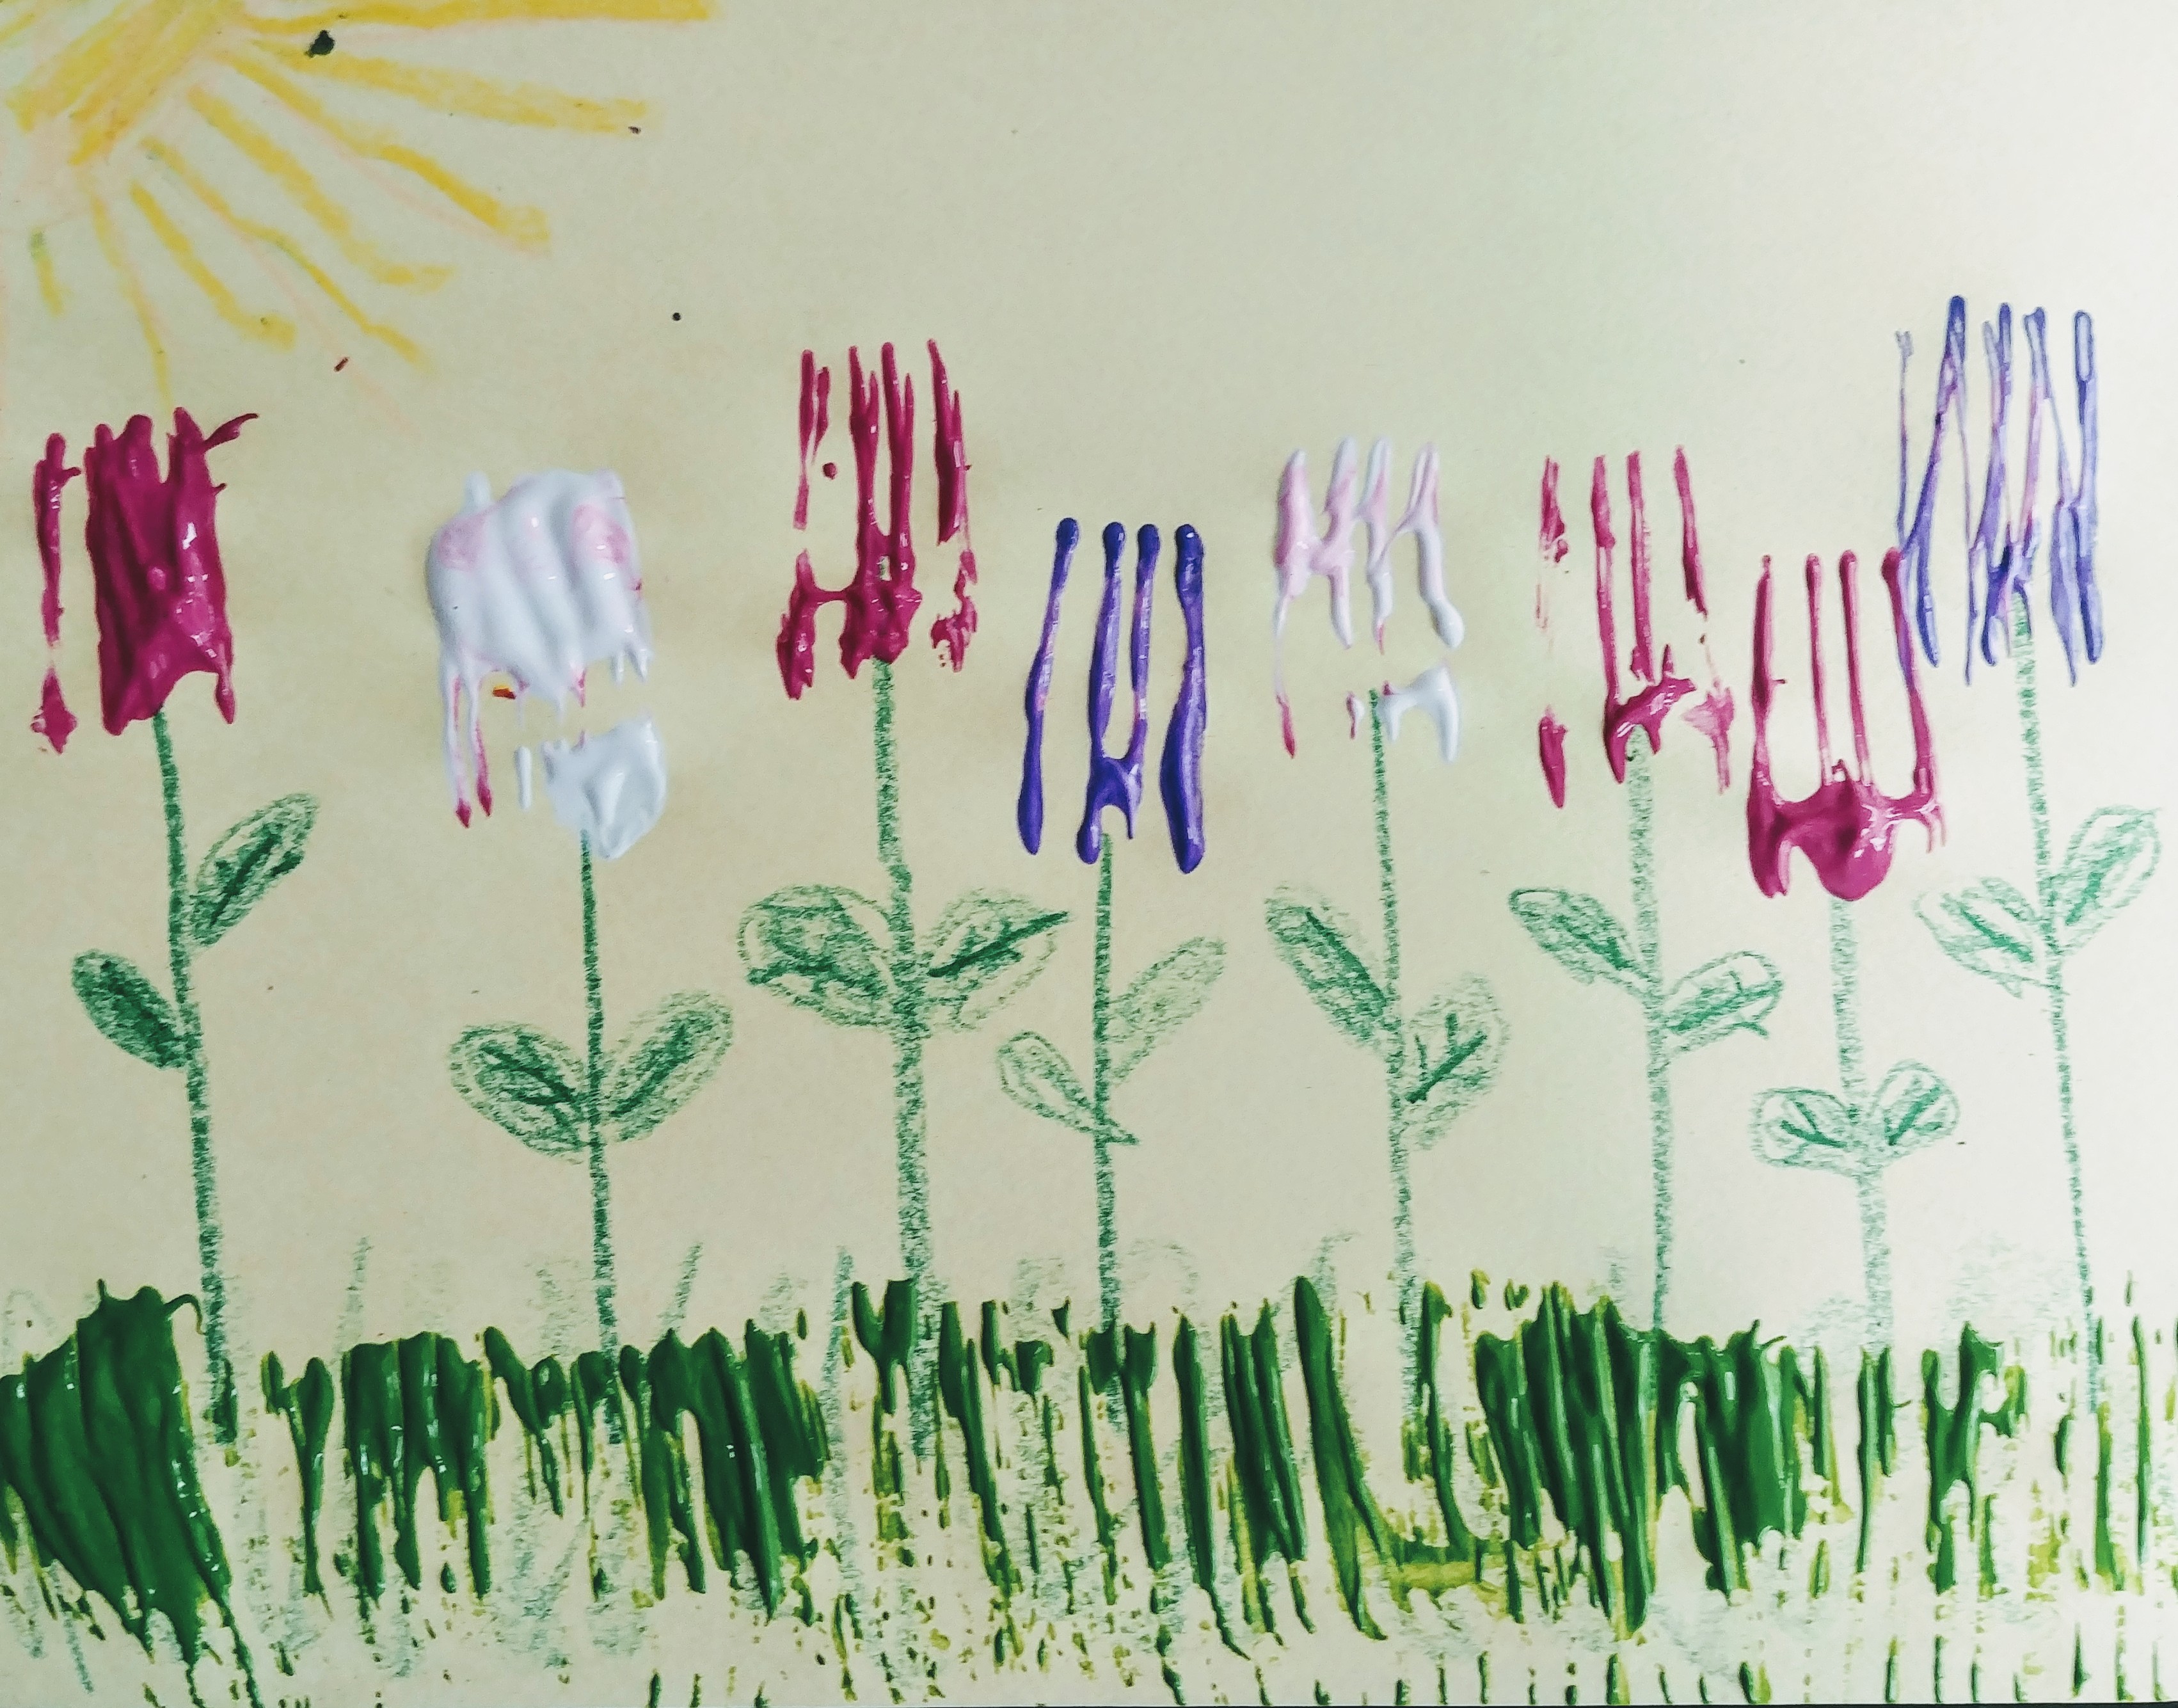
Gather
Supplies: Paper, fork, paint in flowery colors (any of the following:
pink, red, yellow, purple, orange plus green), green marker or crayon
Step 1: Use
your marker or crayon to draw grass along the bottom edge of your paper.
Step 2:
Use your marker or crayon to draw stems growing out of the
grass. Draw leaves on the stems.
Step 3: Dip
back of fork in one color paint.
Step 4: Press
painted fork to top of one green stem. Be sure to roll fork from base of tines
to tip of tines.
Step 5: Repeat
Step 4 using other colors to create a garden of flowers.
Fun
Tip: Wipe or wash your fork between colors, or use separate forks.
Step 6: Use
your fork to paint green grass over your crayon grass
Step 7: Let
your painting dry and save for Sunday and give to Mom for Mother’s Day! Make
another to send to Grandma or your favorite Aunt.
Step 8:
Clean up together.
More
Mother’s Day Ideas
Use
paper, markers or crayons to make Mom a Mother’s Day card.
Use
paint or markers to decorate a ceramic flowerpot.
Make tissue paper flowers (kits available for pick-up, just $5. Text 773.636.1968 to order).
Wednesday, 5/6/2020
JellyFish 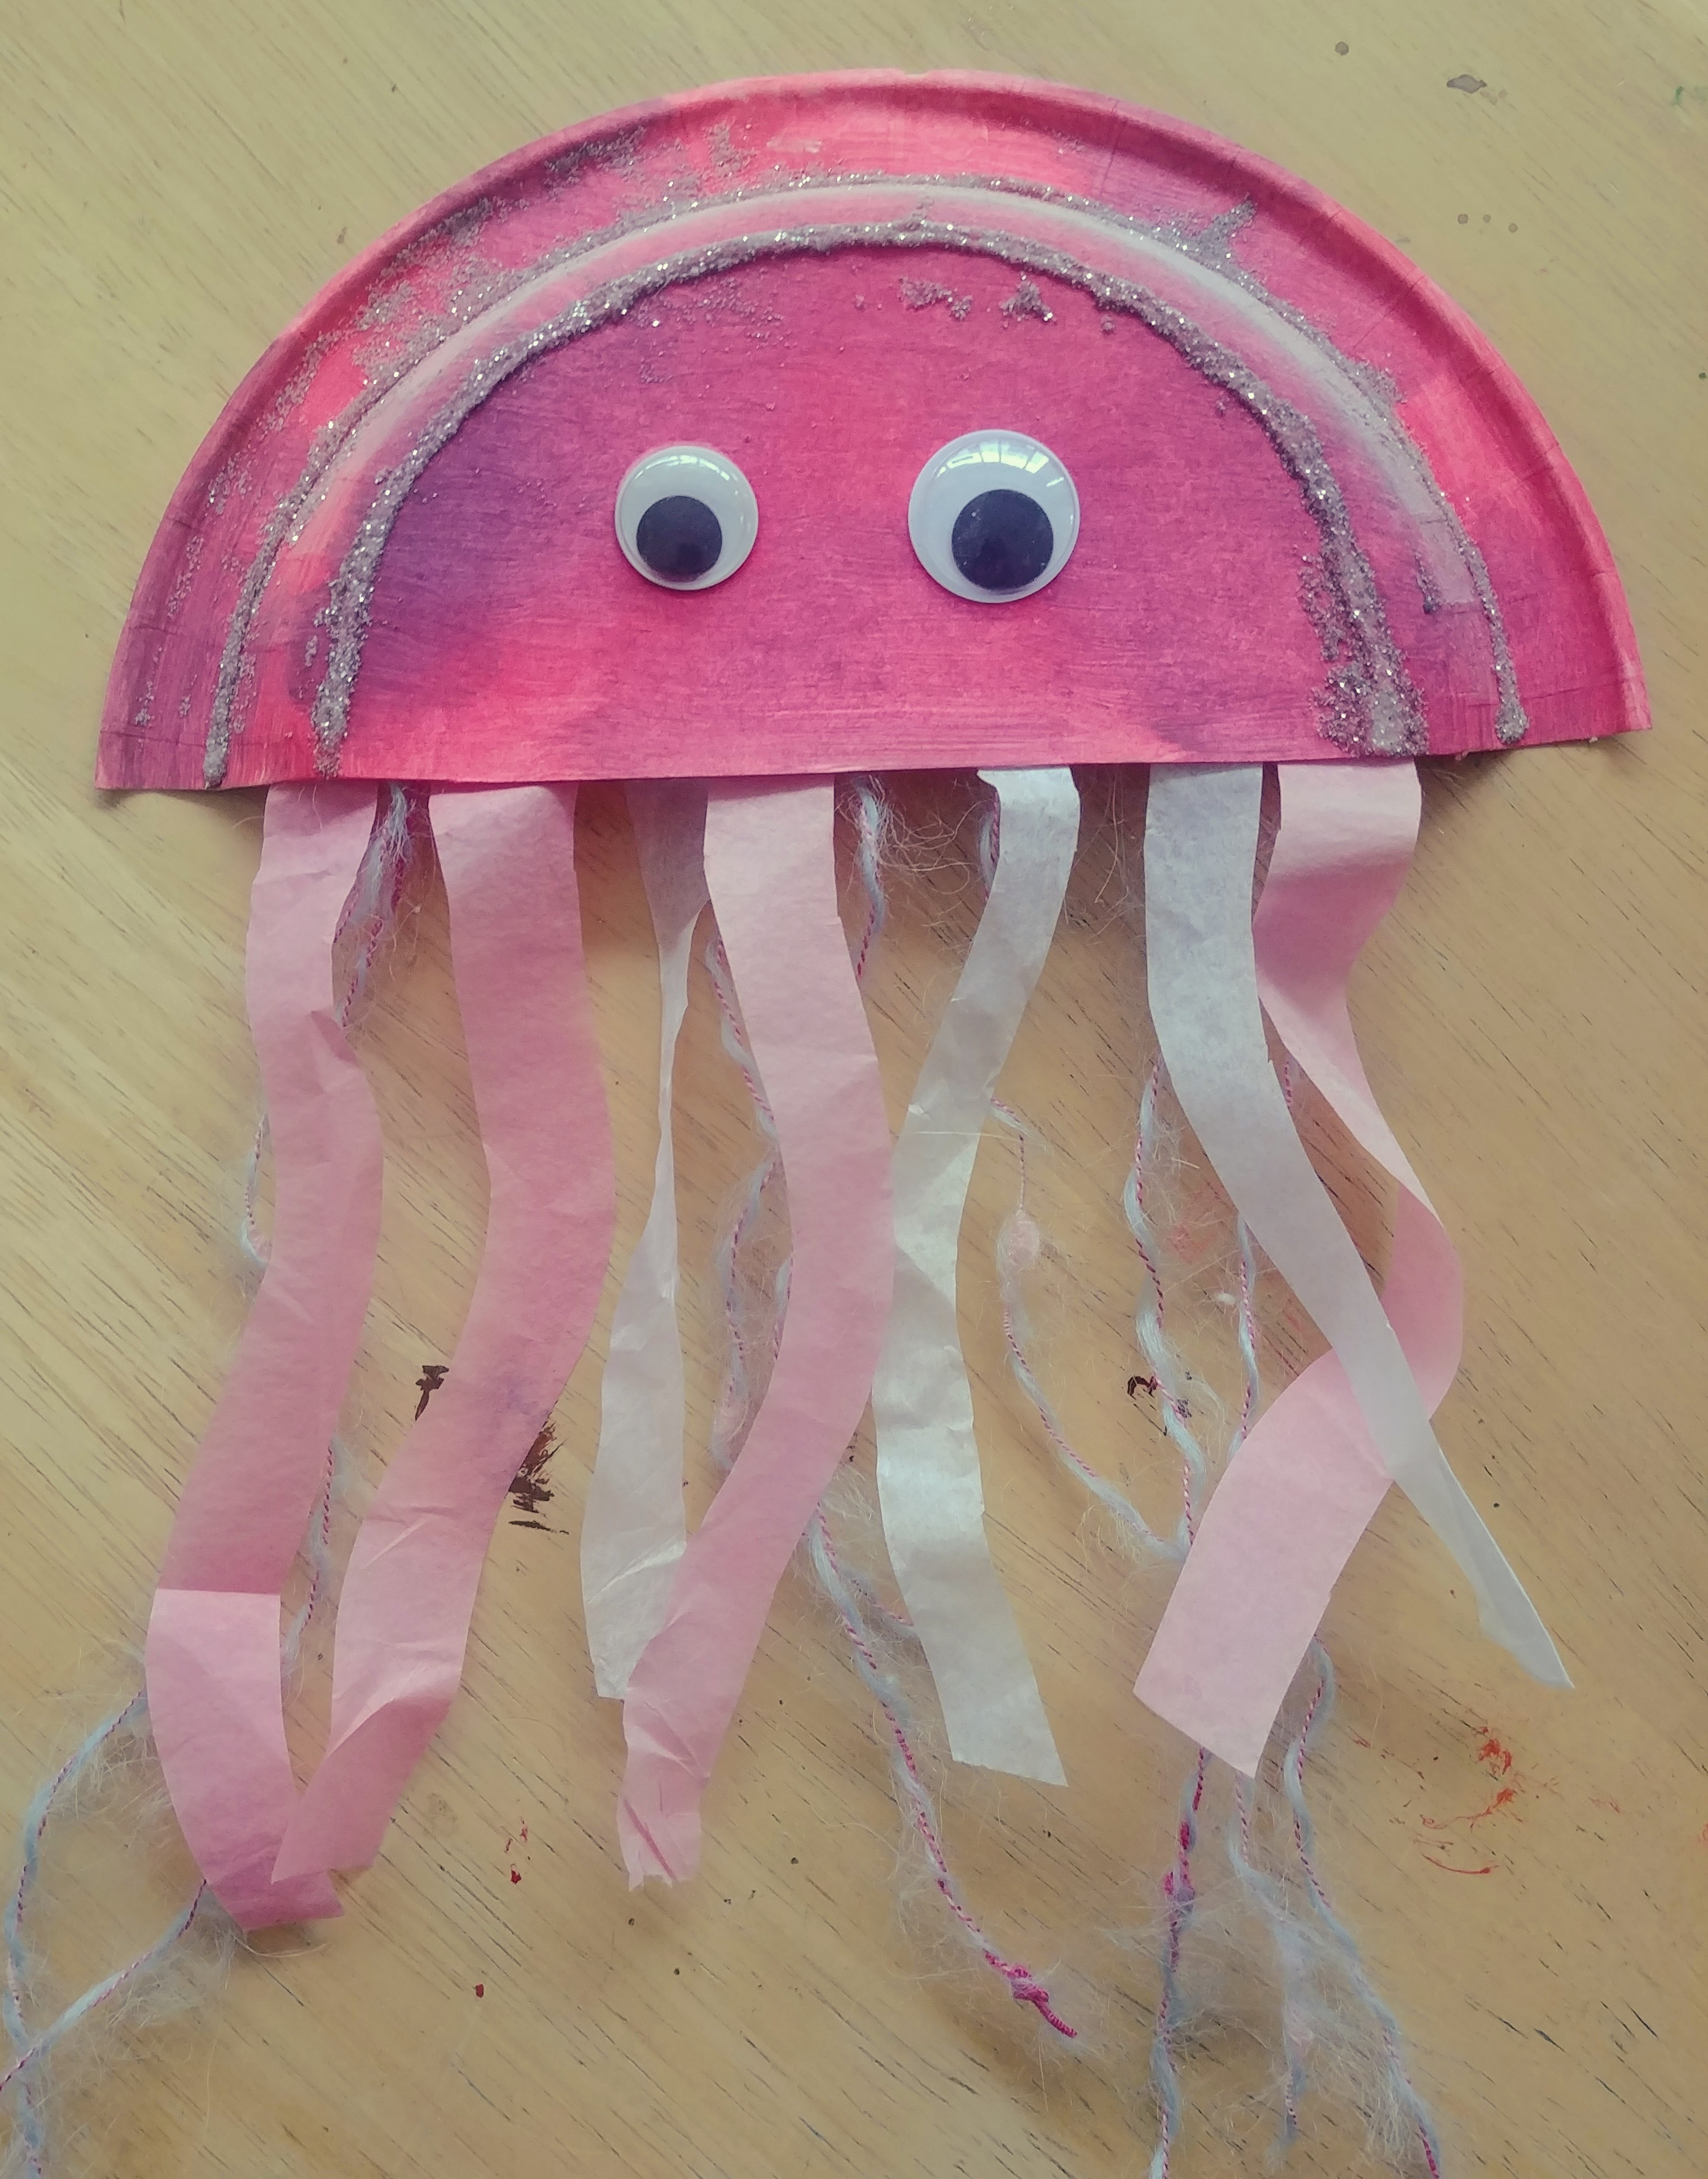
Gather Supplies: Paper plate; scissors; any of the
following: construction paper, tissue paper, party streamers, yarn or string; glue
or tape; paint, markers, or crayons; scissors; google eyes (or white paper and
a sharpie); hole punch and string
Step 1: Cut paper plate in half.
Step 2: Color or paint one half of your paper plate
(or both if you want to make two jellyfish!)
Step 3: Cut 8 or 10 6-8” strips of construction paper,
tissue paper, party streamers, yarn or string. It’s fun if you have at least
two of these items to work with.
Step 4: Affix one end of each strip (from Step 3) to
the back of the plate, along the diameter, so that they hang down.
Step 5: Glue two google eyes to the painted side of
your half-plate. If you don’t have google eyes, use a Sharpie to draw eyes on piece
of white paper and cut them out and glue them onto JellyFish. Or, draw/paint
eyes directly onto JellyFish.
Step 6: Use hole punch to make a hole in top of JellyFish.
Attach a length of string so you can hang your ART.
Step 7: Clean up together.
Step 8: Text or email us a photo of your work and/or
post on social media and tag @thepaintbrush_artstudio THANKS!
Online Classes Start NEXT WEEK! Are you registered yet?
Classes for kids ages 5+ and adult Guided Painting Classes!
See our website for all the new classes! http://www.thepaintbrush.net/class-schedule/
Looking for a private class for just your child or your
child and friends? We can do that, too!
Tuesday, 5/5/2020
Happy Cinco de Mayo 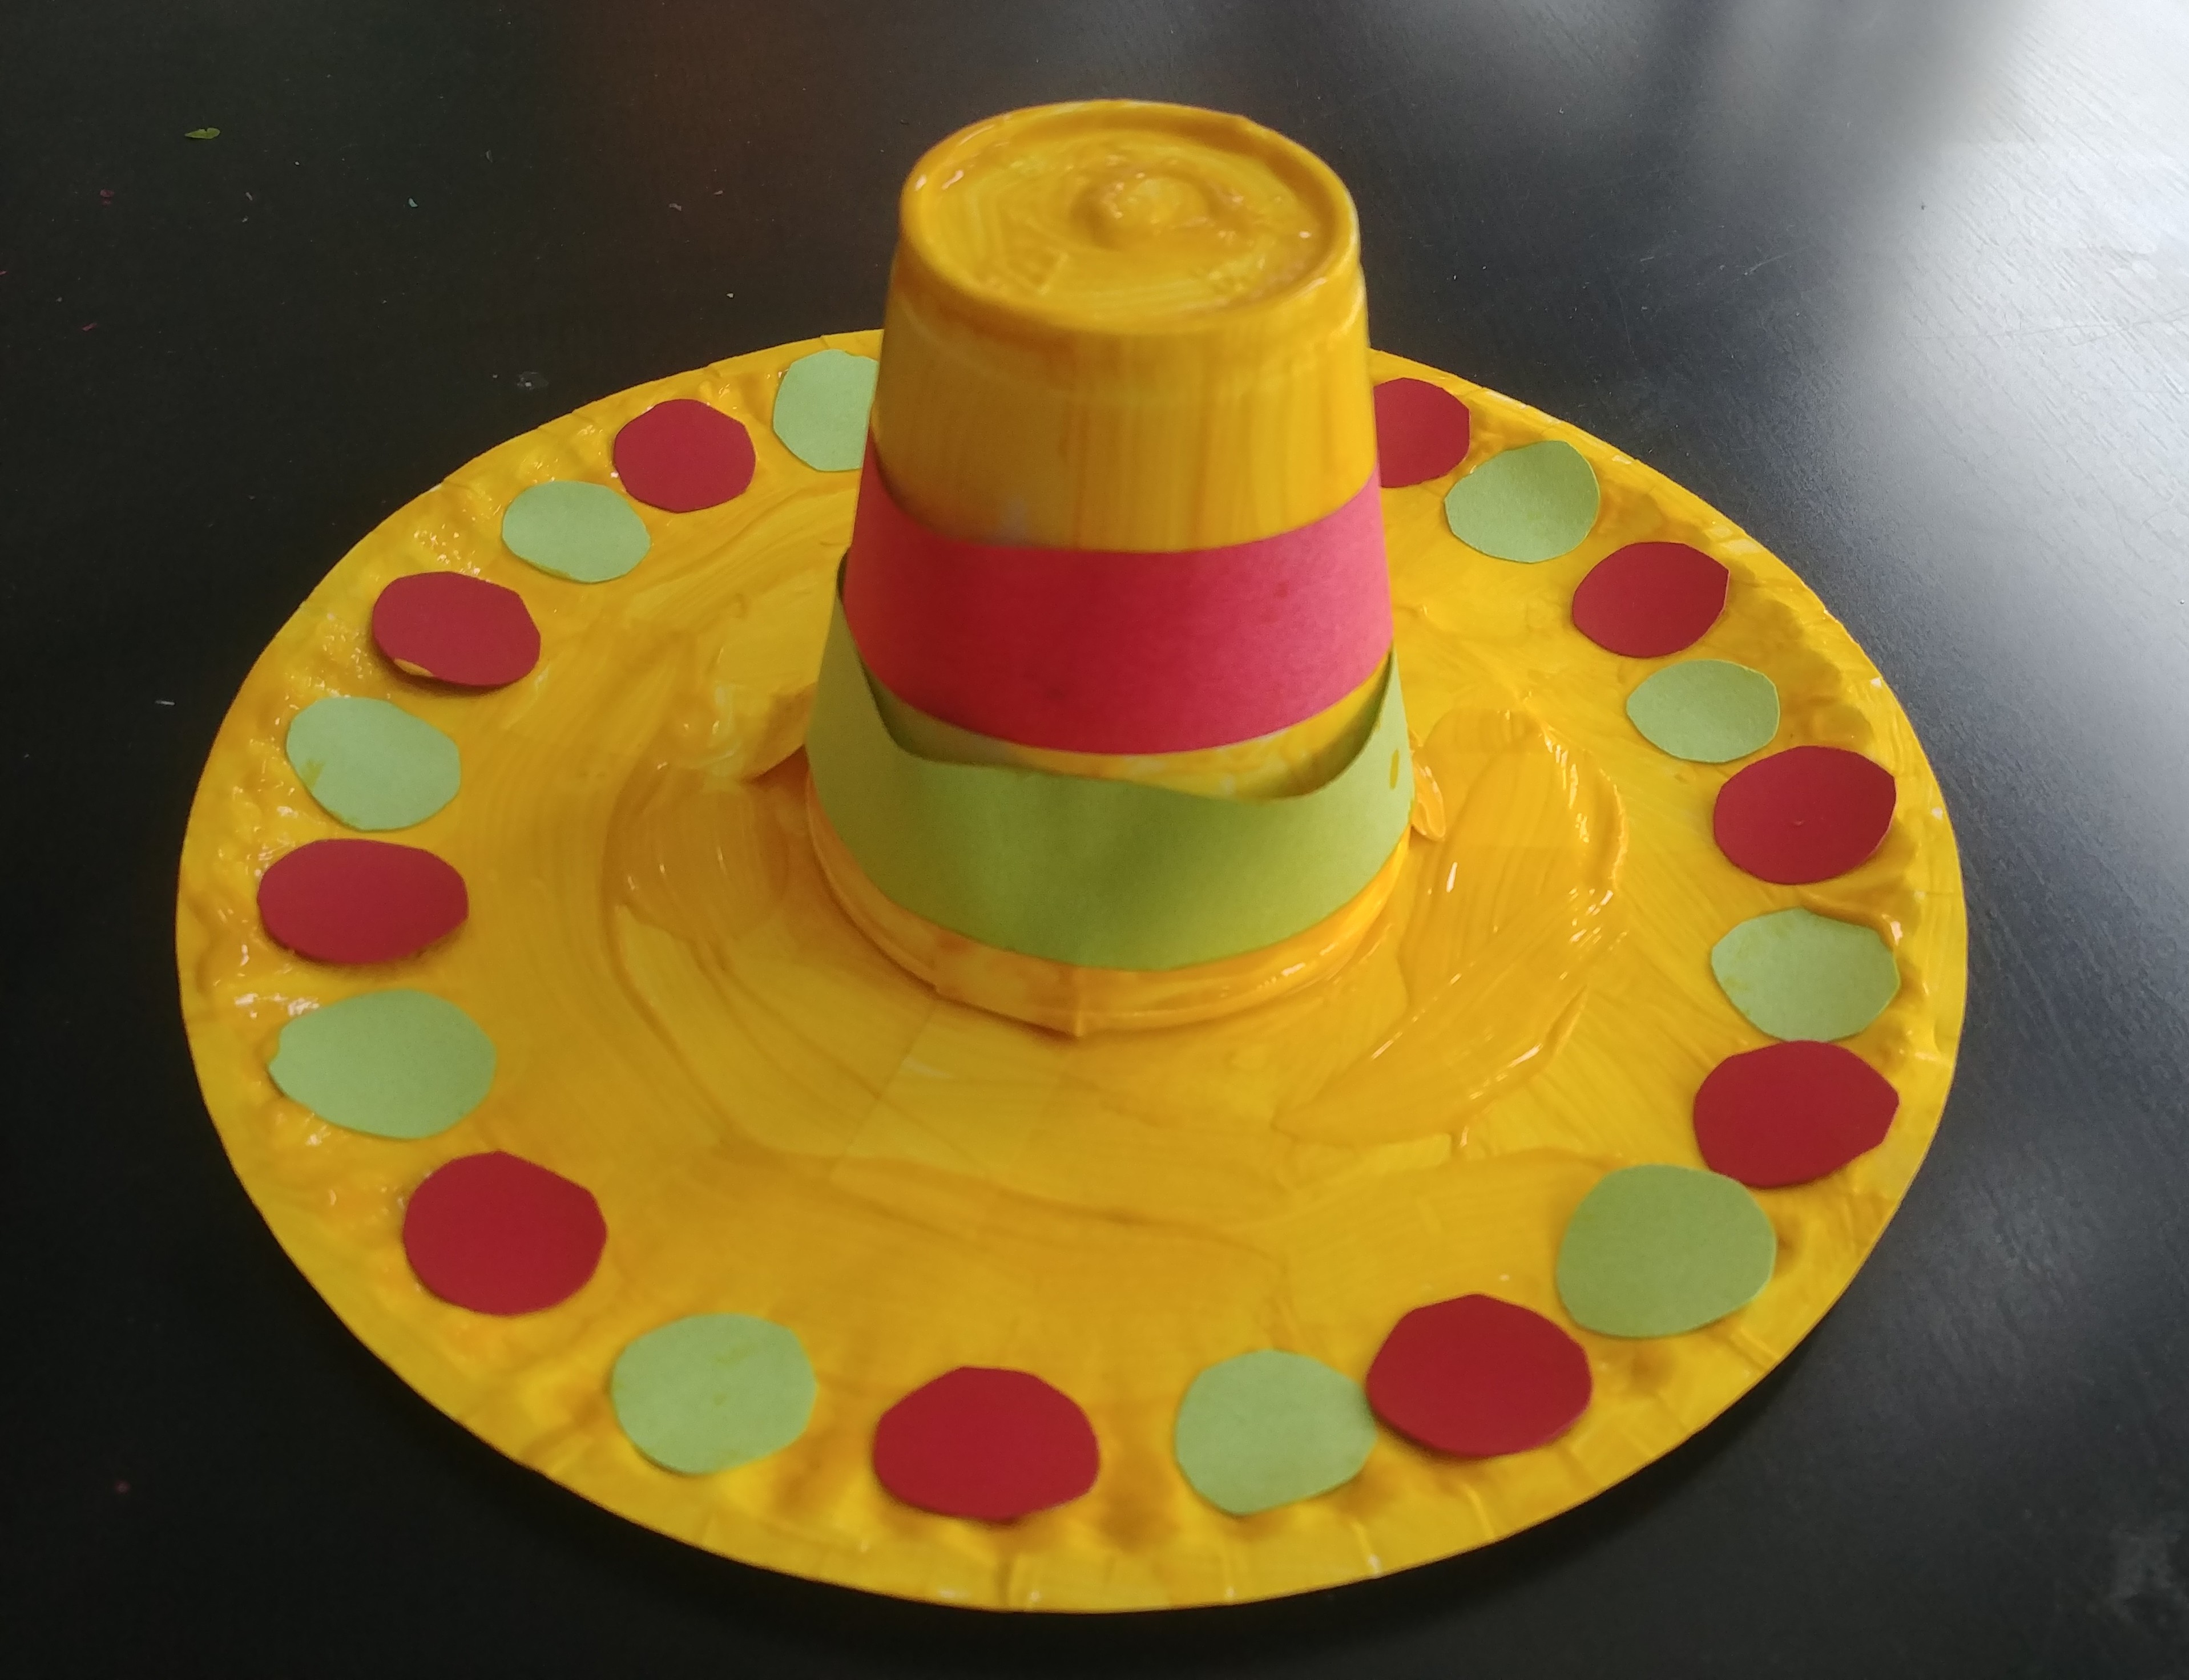 Sombrero
Today’s project celebrates Cinco de Mayo, also known as the Anniversary
of the Battle of Puebla, a Mexican holiday that honors a military victory over the
French forces of Napoleon III in 1862!
Gather Supplies: paper plate, paper cup, tape, markers
or paint or crayons, pompoms and glue (optional)
Step 1: Use yellow paint, crayon or markers to color your
paper plate and cup yellow. If you’re painting, let dry before proceeding to
step 2.
Step 2: Turn your paper cup upside down and tape to
the center of your paper plate.
Step 2: Use your markers or paint to decorate your sombrero
(Mexican sun hat)
Step 3: Glue pompoms or paint/draw circles around the
rim of your sombrero.
Step 4: Clean up together
Step 5: Share photos of your ART on social media and
with us!
Online Classes Start NEXT WEEK! Are you registered yet?
Classes for kids ages 5+ and adult Guided Painting Classes!
See our website for all the new classes! http://www.thepaintbrush.net/class-schedule/
Looking for a private class for just your child or your
child and friends? We can do that, too!
Monday, 5/4/2020
Straw Painting 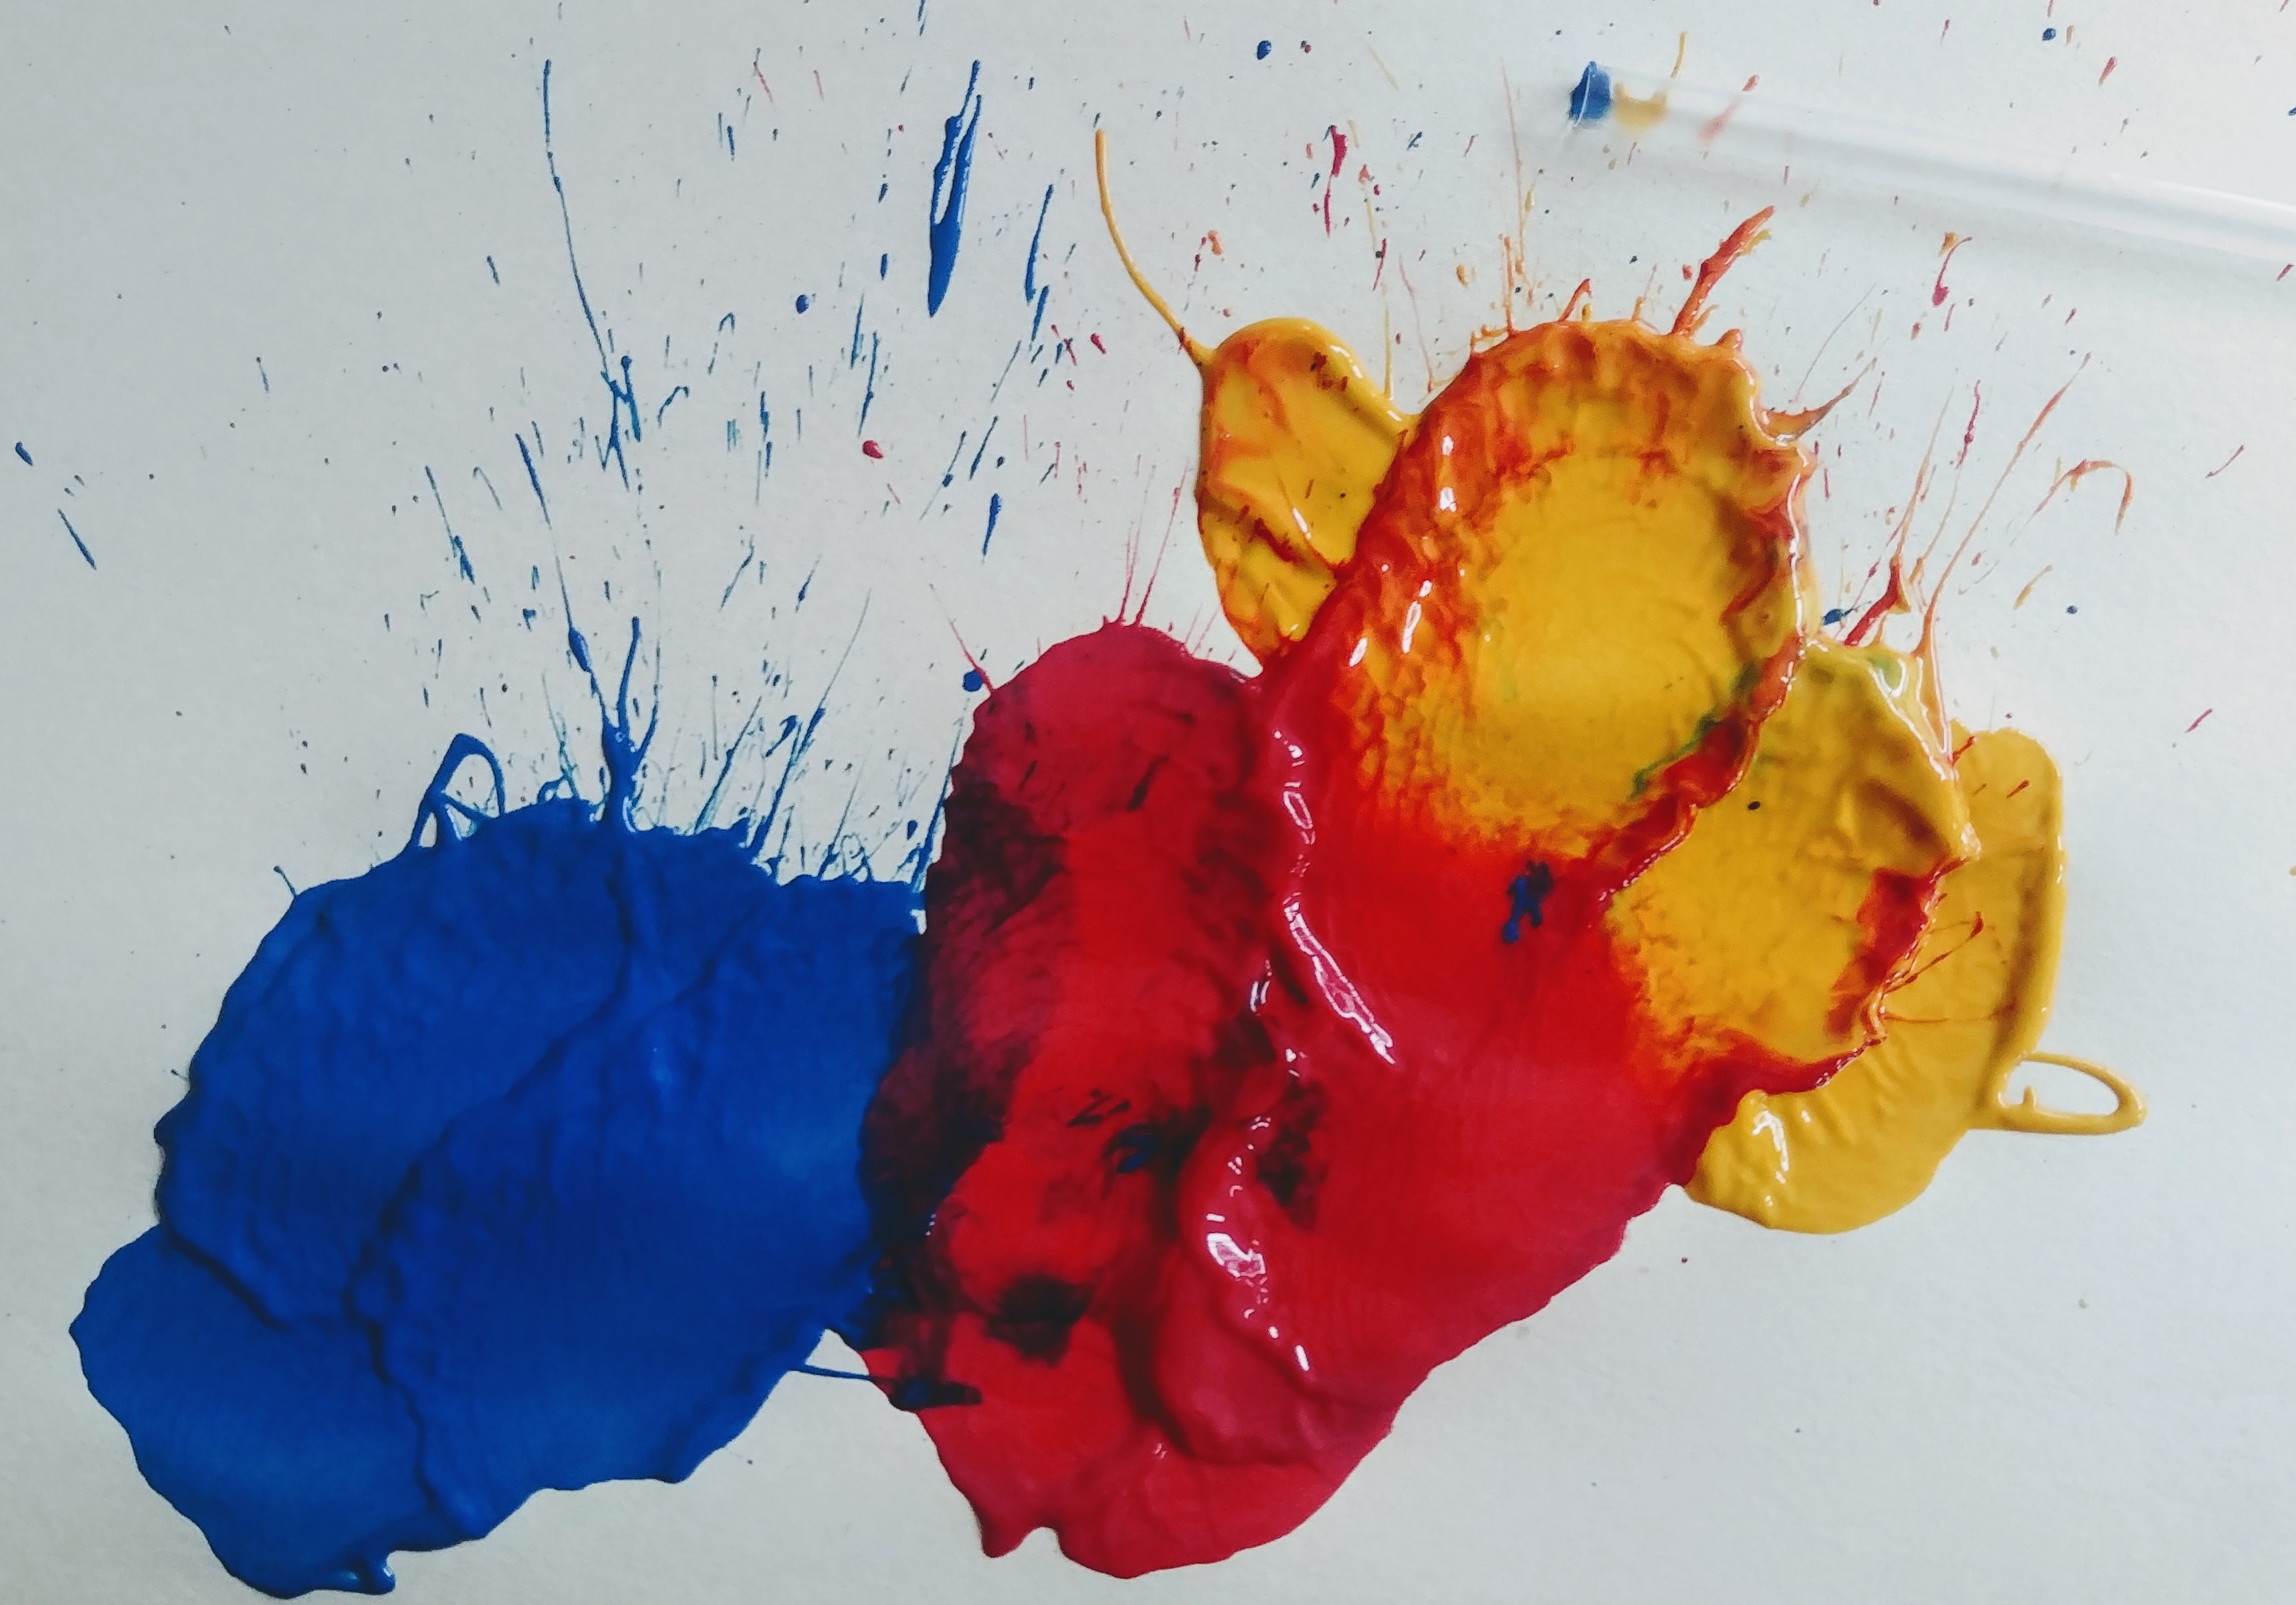
Today’s project requires strong lungs!
Gather Supplies: paper (if you’re running out of plain
paper, cut panels from boxes from your recycling and paint on the black side); tempera
paint, drinking straw, spoon
Step 1: Drip or spoon a quarter-sized glob of paint
onto your paper.
Step 2: Blow through the straw to move the paint
across the paper. Blow with strong breaths. Be careful not to become lightheaded
by blowing too hard or too fast!
Step 3: Repeat with a different color. Try to blow
the paint colors toward each other so they mix.
Fun Tip: Don’t let the straw touch the paint! The
only thing that touches the paint is your strong breath!
Step 4: Clean up together
Step 5: Share photos of your ART on social media and
with us!
Online Classes Start NEXT WEEK! Are you registered yet?
Classes for kids ages 5+ and adult Guided Painting Classes!
See our website for all the new classes! http://www.thepaintbrush.net/class-schedule/
Looking for a private class for just your child or your
child and friends? We can do that, too!
Thursday, 4/30/2020
Homemade Colorful Crayons 
Today’s project allows you to do more
recycling!
Gather Supplies: you’ll need your big shoebox of
crayons, cooking spray, silicone or metal cupcake trays, an adult to help you with
the oven, music to inspire you!
Set oven to 275 degrees.
Step 1: Pick out all the little stubby
crayons.
Step 2: Peel off the paper label. Toss the
paper in the recycling bin.
Step 3: Spray your baking tray with a
generous amount of cooking spray.
Step 4: fill each cavity of your baking tray
with “naked” crayon stubs.
Step 5: Put baking tray in oven.
Step 6: Keep an eye on these using the oven
light and the glass window of your oven. When you see that the crayons are
melted, remove the tray from the oven. Let them cool and harden.
Step 7: Pop your new multicolored crayons
out of the tray.
Step 8: Draw a very colorful picture!
Step 9: Clean up together.
Step 10: Show us a photo of your art!
Wednesday, 4/29/2020
ART Trivia: We learned yesterday that there are
seven colors in the rainbow! Which two are not in the rainbow?
- Red and orange
- Brown and black
- Indigo and violet
- Blue and green
Answer after the Project.
Making Play-Dough
Gather Ingredients: 2 cups all purpose flour, 2
tablespoons vegetable oil (or any kind of oil, including baby oil), ½ cup salt,
2 TBSP cream of tartar, 1 to 1.5 cups hot water, food coloring or liquid
watercolor paint (optional), your favorite music for artistic inspiration, bowl
and spoon, extra flour for workspace
Step 1: Help your child measure all
ingredients except the water and food coloring and pour carefully into the
bowl.
Step 2: Stir carefully so the flour doesn’t fly
all over
Step 3: Have your child continue to stir
while you slowly pour in the water, about half a cup at a time.
Step 4: When the mixture becomes too stiff
to mix with spoon, dust your child’s hands with a light coating of flour and
let them continue to mix by hand.
Step 5: divide the dough into several pieces
and shape into balls.
Step 6: Add a few drops of food coloring to
each ball. The more coloring you add, the darker/brighter the play dough will
be.
Step 7: One at a time, kneed each ball to
mix the color in.
Step 8: Enjoy playing with play dough!
Step 9: Clean up together. If you’d like to
keep your play dough to play with again, store it in a ziplock bag or saran
wrap, so that no air gets to it. If you created a sculpture you’d like to keep,
leave it out to dry.
Step 10: Send us photos and post on social
media and tag @ThePaintbrush_Artstudio
Tuesday, 4/28/2020
ART Trivia: How many colors are in the rainbow?
- 4
- 12
- 7
- 6
Answer after the Project
Painting with Cars 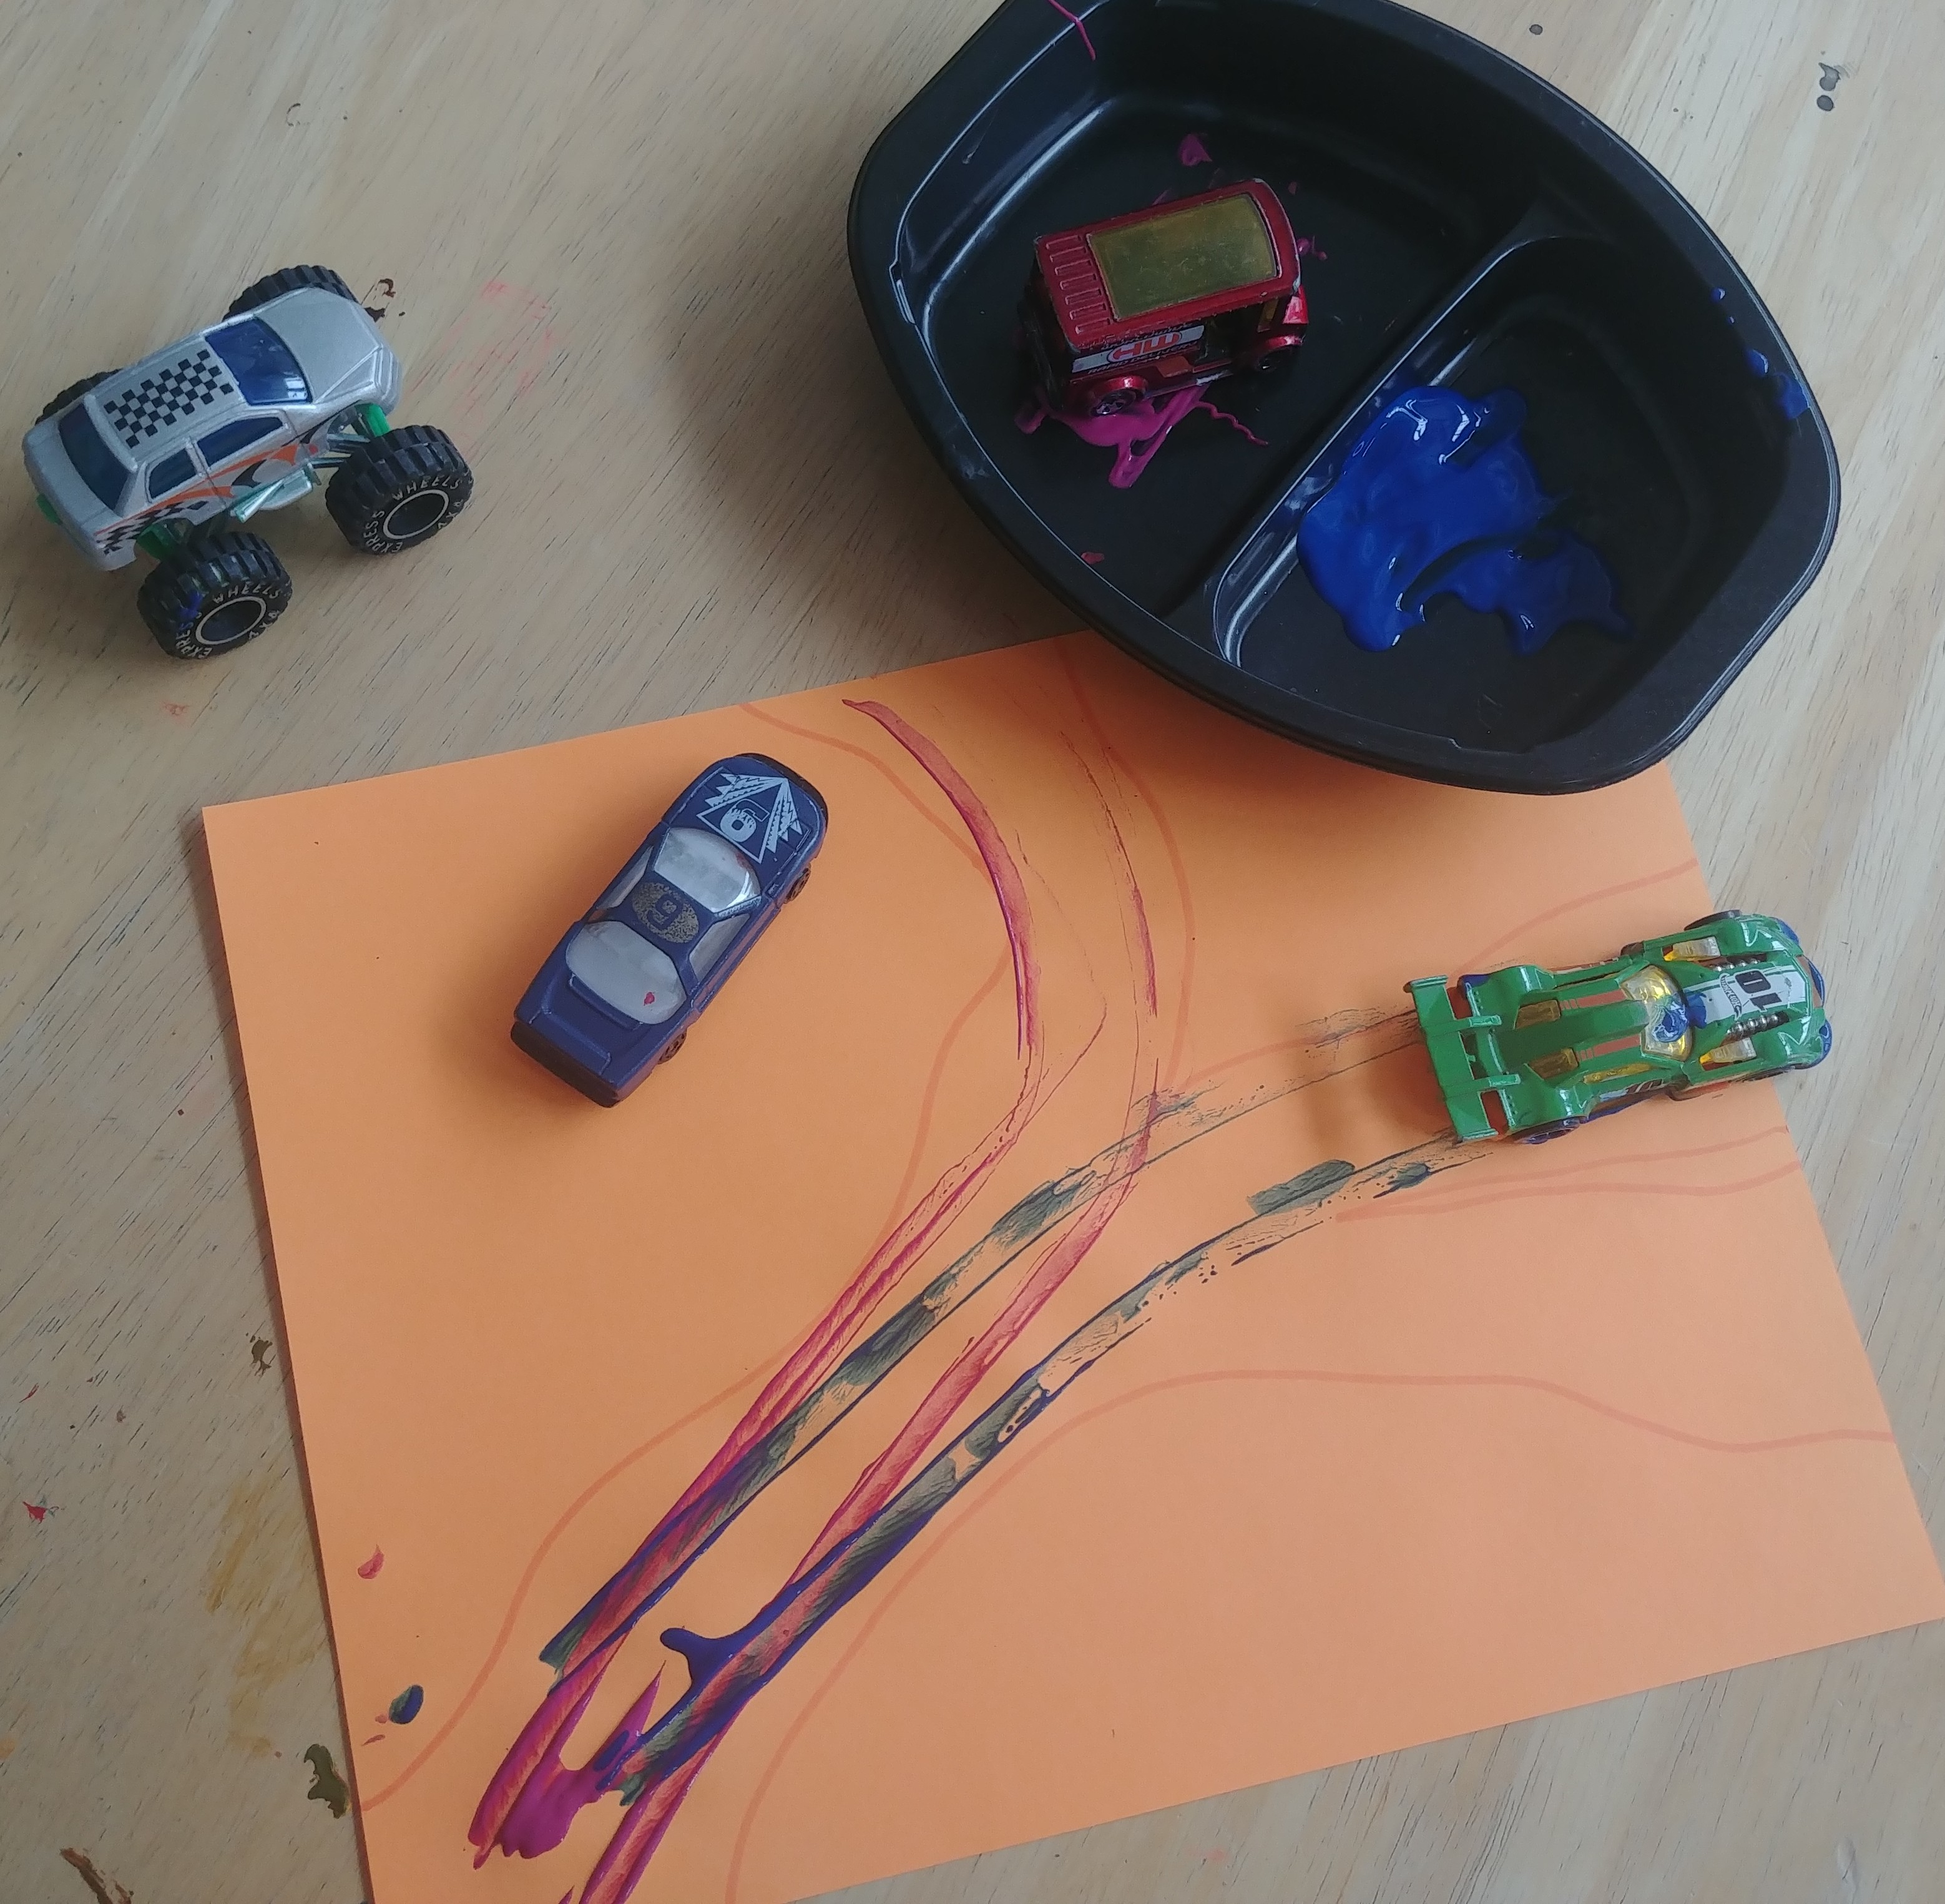
At The Paintbrush we like to paint
with regular paint brushes, but we also like to paint with non-traditional items.
Gather Supplies: paper (if you’re
running out of plain paper, cut panels from boxes from your recycling and paint
on the black side); tempera paint, plastic pans or paper plates to pour paint
into, toy cars (if you don’t have toy cars, what else can you think of to paint
with? Little wind-up toys, Lego
bricks, or even the feet of figure or plastic animal are good idea for
non-traditional painting fun. Let us know if you found something else fun to
paint with.)
Step 1: put on some fun music!
Step 2: Dip a car into one pan of paint
Step 3: “drive” your car across your
paper, making paint tracks with the tires
Step 4: repeat with different colors
Fun Tip: Can you paint a pattern?
Fun Tip: Before you get started, use
markers or crayons to draw out a scene including roads and buildings. Then
drive your painted-wheels car around the roads. This is especially fun if you
have a large piece of paper that you can lay on the floor.
Step 5: Clean up together. Take your
cars to the “car wash” in the sink.
Step 6: Share your photos on social
media and with us!
Trivia Answer: d. 7
Answer to Trivia: b. brown and black
Monday, 4/27/2020
ART Trivia: Thinking about drawing, a line can be
- Straight
- Squiggly
- Sleepy
- Crunchy
- All of the above
Answer after Project
Dot Dot Dot 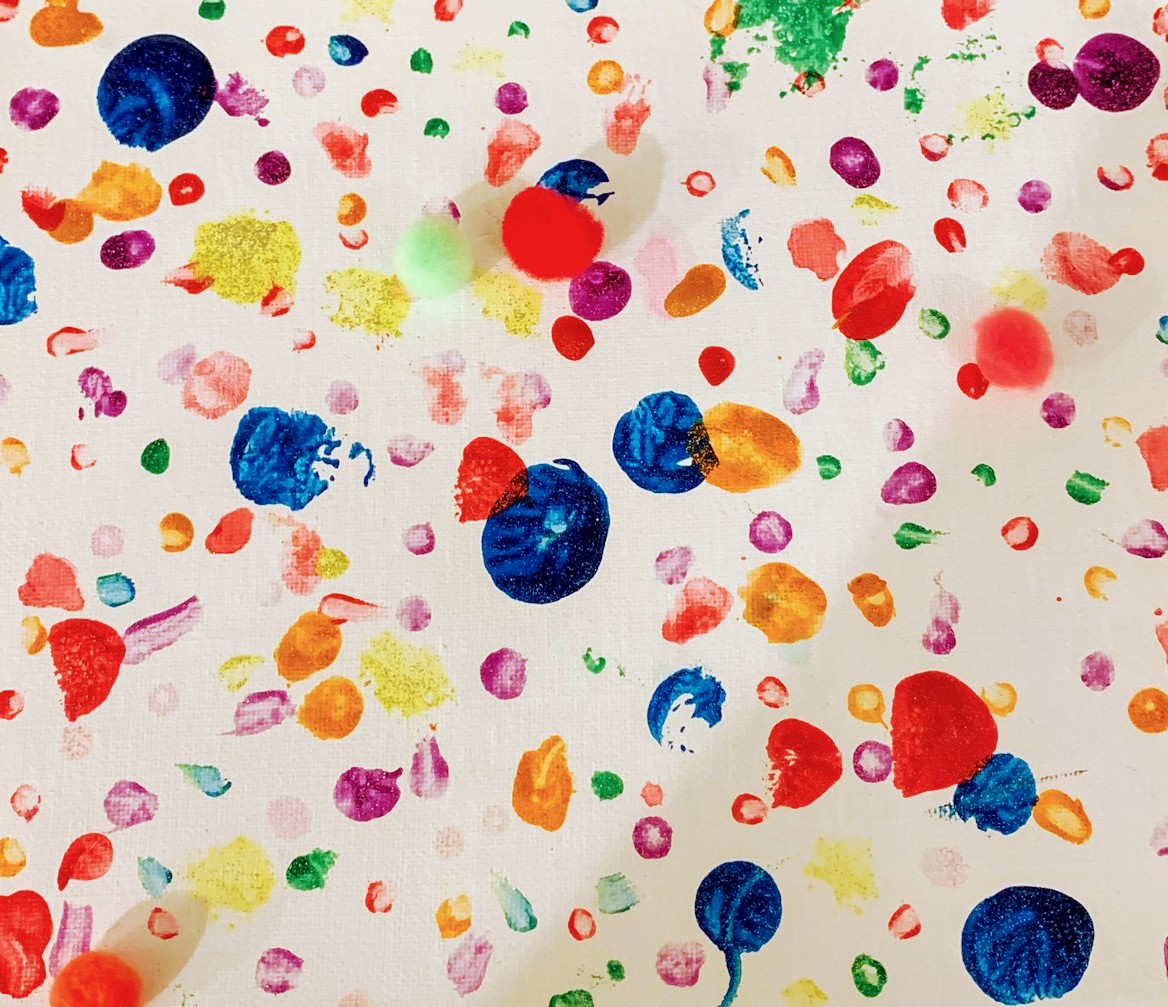
Today’s project focuses on circles and dots!
Gather Supplies: paper (if you’re running out of plain
paper, cut panels from boxes from your recycling and paint on the black side); tempera
paint, plastic pans or paper plates to pour paint into, round items to stamp
with (aluminum cans, wine bottle corks, bottle caps, what else can you find in
your house that is round?), fun music that inspires you to paint (if you’re
painting between 12:00 and 12:45, check out our friend Bryan Harrell, who sings
live every M/W/F/Sun at 12:00 on https://www.facebook.com/bryanharrellmusic)
Step 1: Dip any round item in one color paint and
stamp on your paper
Step 2: dip another round item in another color…
Step 3: repeat, repeat, repeat; dot dot dot
Fun Tip: Find out what happens if you dot one primary
color over another.
Fun Tip: Make another painting, but this time, use your
circles to paint a realistic painting instead of an abstract. Can you paint a
realistic picture using just circles? Try a rainbow!
Step 4: Clean up together
Step 5: Share photos of your ART on social media and with
us!
Answer to Trivia: as we learned on Monday in our At-Home
Drawing Class with Miss Alanna, the answer is e. all of the above
Monday, April 20, 2020
ART Trivia: What do call the color you make when you
mix two primary colors together?
- Red
- Mixed colors
- Secondary colors
- A mess
Answer after the project!
Earth Day is coming up on Wednesday! This week’s project
will celebrate our Earth, which we can all do our part to take care of!
Water Painting
This is an environmentally friendly project that you can do
in even the smallest outdoor space.
Gather supplies: paint brushes of any size (even
house painting brushes would be fun); water (fill a cup, a bowl or a bucket
like the kind you take to the beach with water), Instead of music let’s listen
to the sounds of our neighborhood today
Step 1: Go outside onto your porch, deck, or front
walk. (If you are out front where people can pass by, be sure you have your
mask on!)
Step 2: Use your paintbrushes and water to “paint” on
the deck or sidewalk or on your fence or the side of your house. It’s water, so
there is no mess and nothing to clean up afterwards!
Step 3: If you have sun in some areas and shade in
others, paint the same water painting in both areas and have your grown-up use
the timer on their phone to time how long each takes to disappear. What did you
find out? Let us know!
Answer to Trivia: c. Secondary colors
Wednesday, 4/15/2020
ART
Trivia: In which century was French painter Claude Monet born?
a. 1700s
b. 1800s
c. 1900s
d. 2000s
“THANK YOU” POSTER
Every
day your postal worker brings our mail. Delivery drivers from UPS, FedEx and
USPS, your favorite restaurants and grocery stores, (and even The Paintbrush),
bring packages and food to our house regularly so that we can stay home and
stay safe. These essential workers are out there working hard so you and your
family can stay safe at home. Let’s tell them how grateful we are with a THANK
YOU Poster.
Gather Supplies: Paper (another paper grocery bag like we used
yesterday works well if you are running out of drawing paper or construction
paper), markers or crayons, paints (optional), any other embellishment art
supplies you have, tape, music that inspires you to create art!
Step 1: Write the words THANK YOU, DELIVERY DRIVERS! (Don’t forget the
important comma and exclamation mark.)
Step 2: You may wish to write the specific titles of drivers who visit
your house regularly: UPS, FedEx, USPS, GrubHub, Instacart etc.
Step 3: Draw pictures of the delivery people, or the goods they deliver,
or just draw your favorite happy pictures (rainbows, flowers, dinosaurs, etc.).
Step 4: Tape your poster on your front door or in your front window or
near your mail box.
Step 5: Go an extra step: Leave a basket of goodies for your drivers:
water bottles, juice boxes, granola bars, small bags of chips. Be sure to put a
note with your treats so they know to help themselves.
Step 6: Clean up together
Step 7: Send us a photo and/or post on social media!
Trivia Answer: b. Monet was
born in the 1800s (1840 to be exact)
Tuesday, 4/14/2020
ART
Trivia: Which is not an ART Museum in Chicago?
a. The
Great Chicago ART Museum
b. The ART
Institute of Chicago
c. DePaul
ART Museum
d. Museum of
Contemporary ART
BIG HUG
We’re
all missing people we love while we’re staying home to keep those same people
safe and well. Do you know someone who would like a big hug? Let’s make one!
Gather Supplies: Scissors, paper grocery bag, markers or
crayons, paints (optional), any other embellishment art supplies you have,
music that inspires you to create art!
Step 1: Cut the (thin) side panels off your grocery bag so that you can
spread the bag out and make a long sheet of paper.
Step 2: Lay the paper bag on the floor, printed side down.
Step 3: Lie down on so your head and outstretched arms are on the paper.
(If you’re a bigger kid, you may need to use two bags, taped one above the
other.)
Step 4: Have your grown-up trace your arms, shoulders, neck and head.
Step 5: Use your markers, crayons, and/or paints to color in your outline
to look like you!
Step 6: (Optional) Cut out your tracing.
Step 7: (Optional) Pack your hug up in a big envelope and mail it to
someone you love!
Step 8: Clean up together
Step 9: Send us a photo and/or post on social media!
Trivia Answer: a. The Great
Chicago ART Museum
If you like these and want to see more PLEASE click here to purchase a GC good toward anything you want to come to the studio for in the future, or text 773.636.1968 to request a payment link or drop your spare change into our new Venmo account @ThePaintbrush_Artstudio to make a contribution toward helping us continue to bring you fun art at home now and in the studio in the (hopefully near) future. THANK YOU!
Monday, 4/13/2020
HAPPY HANDS
We do all sorts of interesting things with
handprints during Paint&Play at The Paintbrush. You may remember our Thanksgiving
turkey handprints, our Santa and reindeer and Grinch at Christmastime, our
Hanukkah menorah, and our rainbow flag for Pride Week.
What creative things can you turn your hand into?
Gather Supplies: paper, markers or crayons,
any other embellishment art supplies you have
Step 1: trace your hand on a piece of paper
Step 2: turn your hand tracing into something
creative! Your hand can be the branches of a tree or the petals of a flower. Your
hand, upside down can be an octopus or a ghost. The possibilities are endless.
Step 3: Clean up together
Step 4: Post your creations on social media
and tag @thepaintbrush_artstudio or text us your photos to 773.636.1968
Friday, 4/9/2020
If you ordered an ARTsy Easter Baskets please stop by the studio for No-Contact Pick-Up this morning 10:30-12:00. Unfortunately there are no extras. If you are not able to pick up your order this morning please text us at 773.636.1968 or reply to this email. If you ordered delivery, we will be dropping of your basket by the end of the day.
———————————————————————————-
DECORATING EASTER EGGS
With all the restrictions on shopping and the important Stay-at-Home Order we know some of you are struggling with how to decorate Easter Eggs.
Tips before you begin:
- cover your work space with newspaper before you begin
- food coloring may stain surfaces and hands; use care
- Be sure to hard-boil your eggs first (about 20 minutes on the stove should do the trick)
- Let your eggs cool before you start to decorate them
- If you are rationing food right now, Easter Eggs are edible! Think deviled eggs, egg salad, hard boiled eggs sliced on salads….
Here are some of our favorite ideas.
Easter Egg Decorating Idea #1 – SHAVING CREAM Fill a baking sheet with Shaving Cream. Sprinkle drops of food coloring here and there. Drag a spoon through the drops of food coloring to create a marble effect. One at a time roll your hard boiled eggs thru the shaving cream. Set aside. Wipe off when you’re finished with all of your eggs. The food coloring will leave a marble effect on your eggs.
Easter Egg Decorating Idea #2 – CRAYON RESIST Use white or light colored crayons to draw on your eggs. Paint over the drawings with your water color paints. The crayon drawings will show through the paint.
Easter Egg Decorating Idea #3 – WATER COLORS Simply use your water color paints to paint beautiful designs of color on your eggs.
Easter Egg Decorating Idea #4 – DRIP EGGS Gently squeeze a drop of food coloring onto your egg. Let the color drip down the sides. You can also do this using water color paint. Get your paintbrush very wet before picking up the paint, then just let it drip down onto your egg.
Easter Egg Decorating Idea #5 – SPLATTER EGGS Dip your paintbrush into your water color or tempera paint. Hold your brush over the egg with one hand and tap tightly on the brush handle with one finger of your other hand. This will cause the paint to splatter down onto your eggs.
Easter Egg Decorating Idea #6 – GLITTER! Dip your egg into a small dish of glue or “draw” on your egg with a glue stick. Place your egg gently into a bowl or baggie filled with glitter. Gently roll the egg around to coat it with glitter!
Easter Egg Decorating Idea #7 – COLORED RICE Prepare a ziplock baggie with half a cup of uncooked rice, a few drops of food coloring of your choice, and a cap-full of rubbing alcohol. Zip the bag closed and kneed the rice until it’s colored. Insert egg and gently roll around so the color transfers to the egg. (When finished, pour the rice onto a plate and let us dry. You can use your colored rice later to make an art project involving glue and “drawing” with colored rice!)
Easter Egg Decorating Idea #8 – STICKERS Who doesn’t love stickers? Cover your egg with your faves!
Easter Egg Decorating Idea #9 – MARKERS Many years ago a very accomplished artist joined us for Easter Egg decorating. Using just fine tipped markers, our artist friend created tiny, detailed scenes. We were inspired to create our own intricately designed eggs. Abstract art is great, too!
Easter Egg Decorating Idea #10 – MAKE YOUR OWN DYE Fill a small bowl with half a cup of hot water from the tap; add a few drops of food coloring (the more you add the darker the pigment), and a capfull of vinegar. Voila! Easter Egg Dye! The longer you leave your egg in the dye the darker it will become. Use a tablespoon to lift eggs out.
Easter Egg Decorating Idea #11 – COMBO EGGS Use a combination of ideas to create the most unique eggs. Crayon resist should work with Idea #10. Or, add glitter or markers to dyed eggs…. The possibilities are endless.
We would love to see your Easter Eggs! We posted ours on our Instagram! (We’re keeping it simple and trying Idea #10.) Check it out at thepaintbrush_artstudio
Thursday, 4/9/2020
ART Trivia: “Medium” is an art
term that describes
- The size
of an artist’s paint brush - The size
of an artist’s canvas - A school
of painting - A material
or technique
Answer after the project….
EASTER STAMPING
Pull out few toilet paper rolls or paper towel rolls from your recycling bin. We’re going to do some recycled art again!
Gather Supplies: paper
towel rolls or toilet paper rolls, pastel paint (start with white paint and add
a little red to make pink, a little blue to make light blue, etc.), paper, glue
Step 1: Have your grownup bend the
end of one t.p. roll into an egg shape by pinching one side and then letting it
relax. This will be your egg stamper.
Step 2: Using 3 t.p. rolls, bend the ends of two rolls into the shape of bunny ears by pinching opposite sides of one one roll and then pinching the other roll the same way.
Step 3: Glue the ears (that you just
made in Step 2) to the 3rd t.p. roll so that you have a bunny face.
Your grown-up will need to hold this for a couple minutes while it dries.
Step 4: Use your bunny and egg
stampers to make an Easter print on your paper
Step 5: Clean up together
Step 6: Send us a photo of your art
and/or post on social media and tag @ThePaintbrush_ARTstudio
Answer to ART Trivia: d. A material
or technique
Thursday, 4/2/2020
If you missed
our first ARTist StoryTime with The Paintbrush you can see today’s story about
Artist Roy Lichtenstein, read by our own Mr. Hayden on our facebook page. Tips
will be accepted at @ThePaintbrush-ARTstudio. We will get thru this together!
Thank you for your ongoing support!
ART
TRIVIA: Which famous
artist is not an American painter?
- Paul
Klee - Edward
Hopper - Winslow
Homer - Andrew
Wyeth
Look for the
answer tomorrow!
Answer to
yesterday’s question is b. People
Painting
With String
Gather
Supplies: Today’s
project can be created on plain paper, canvas, a panel from a cardboard box, or
the inside of a shoebox lid. Whatever you have handy! You also need string or
yarn, glue, and paint, markers or colored pencils and music to inspire you!
Step 1: Use your glue to “draw” a doodle or
squiggle like you did last week for the Music Doodles project.
Step 2: Carefully lay your yarn or string
over the glue doodle.
Step 3: Wait for the glue to dry. (Sit
quietly and listen to your music; or take a dance break!)
Step 4: When glue is dry, use paint or
markers or colored pencils to color inside the yarn/string lines.
The end
product of this creation may look a lot like a touchable version of your Music
Doodles from last week. Put the two side by side and talk about how they are
the same and how they are different. Send us a photo!
Step 5: Clean up together
Step 6: Send us a photo and/or post on social
media!
Wednesday, 4/1/2020
Welcome to April! Easter is coming soon. ARTsy Easter Baskets are ready for no-contact pick-up or delivery. Click here to order THE LAST ONE today!
Join us
tomorrow at https://www.facebook.com/ThePaintbrushChicago/live/
for ARTist StoryTime with The Paintbrush. We’ll be live at 5pm so you (parents!)
can get dinner ready without interruption. Each reading session will feature an
ARTist we like to learn about at The Paintbrush. Join us! If you love it, share
it. Tips will be accepted at @ThePaintbrush-ARTstudio. We will get thru this together!
Thank you for your ongoing support!
ART TRIVIA: When artists talk about figure
drawing they mean drawings of:
- Landscapes
- people
- Flowers
- Numbers
that look like people
Look for the answer
tomorrow!
Let’s make a SCULPTURE!
Gather
Supplies: cardboard
box of any size (or shoebox!), masking tape, small boxes from your recycling
bin, glue, tempera paint (or acrylic paint if you are good at NOT getting
messy) and music to inspire you!
Step 1: Cut off corners of some of your small
boxes to make triangles.
Step 2: Glue triangles and other small boxes
to the top and sides of your cardboard box. Use masking tape to secure the
boxes and cover any pointy corners.
Step 4: Use your tempera paints to paint each
edge and surface of your sculpture a different color.
Step 5: Clean up together.
Step 6: Send us a photo and/or post on social
media!
Tuesday, 3/31/2020
Things-From-Home
3-D Collage
Today we are
going to make a collage out of ordinary things from home.
Suggested
Supplies: Q-tips, macaroni
(or other dry pasta), dry beans, popcorn kernels, rice, cardboard box, glue,
paint, string, cotton balls…. and music to inspire you!
Step 1: Cut a panel from a cardboard box to
use as your base.
Step 2: If you have tempera paints, markers
or pastels, create a picture on your cardboard. It can be a realistic picture
or an abstract design or just colors.
Step 3: Glue items from your supply list
(above) to create a picture. Example: glue a line of rice across the bottom to
make grass, then glue Q-tips to make flower stems; use pasta to make flower
petals; glue cotton balls at the top of your picture to create fluffy clouds. Or
make a pattern gluing down the various supplies. Tots may just practice gluing
the various items to the cardboard with no set plan. Do your own thing; no rules.
It’s all fun!
Step 4: Clean up together.
Step 5: Send us a photo and/or post on social
media!
Check back here regularly for projects and ideas!
Monday,
3/30/2020
One
Thursday we used recycled egg cartons to create caterpillars. What do
caterpillars turn into? BUTTERFLIES
Let’s make
BUTTERFLIES
Gather
Supplies: paper
plate, scissors, hole punch, pipe cleaners, straw, tape, paint and music to
inspire you!
Step 1: Fold your paper plate in half. Cut to
make the shape of a butterfly (basically two lumps). Open.
Step 2: Use hole punch to make a hole in the
middle of the plate, toward the bottom of the crease.
Step 3: Insert the bendy portion of the straw
thru the hole from the back so the long part is hanging down. Tape the short part
to the plate to hold it steady. This “stem” will make it easier to display your
butterfly or to play with it by popping it up and down to make its wings flap!
Step 4: Use tape or hole punch to attach small
pieces of pip cleaner to make antennae.
Step 5: Paint your butterfly.
Step 6: Fold in half again so the paint smushes
from one side to the other.
Step 7: Open. Look at the new painting. Is it the
same on both sides now? That’s called symmetry. Fun tip: Look up Symmetry in
Nature.
Step 8: Clean up together.
Step 9: Send us a photo and/or post on social
media!
A great
place to display your butterfly is in a houseplant or in your Soup Can Pencil
Cup!
More
tomorrow!
Friday,
3/27/2020
Today we’re visiting another famous ART Museum: The Metropolitan Museum of ART in New York. We like to look at our World Map here at The Paintbrush to see where our artist-of-the-week is from. If you have a globe or a world map at home, help your kids locate New York. (If you don’t have a map, you can find one at https://geology.com/world/world-map.shtml.) Then help your kids locate Chicago. Ask your kids if Chicago and New York are close to each other or far apart. Ask them how they think we could get to New York if we wanted to visit.
Click https://www.metmuseum.org/art/online-features/metkids/
to access all sorts of adventures,
from galleries to art ideas for kids. You’re going to love this one!
While you’re on your tour, look for ART that really stands out to you and your kids. At The Paintbrush we are often inspired by works of ART that we see during our own visits to ART museums. We create our studio projects from this inspiration. What are you inspired to create based on your visit to The Met today?
Thursday, 3/26/2020
Here we
are, still at home! Are you having fun? Show us your ART via text or email. We
want to see what you’re creating!
Today we’re
digging in the recycling bin again. Pull out those egg cartons. We’re making
caterpillars.
Gather
Supplies: egg carton, scissors, pipe cleaners (or straws), markers (or paint),
google eyes (or white paper and black marker).
This is an
easy project (for those of you still recovering from Monday’s paper mache
project!).
Step 1:
Cut off top of egg carton.
Step 2:
Cut egg carton in half so you have two rows of 6. If you have more than 2 kids
or want to make more caterpillars cut again to make 4 rows of three.
Step 3:
Parent can use a hole puncher, a pen or the tip of a knife to poke holes in the
top of one end. Insert small lengths of pipe cleaner thru the holes to make
antennae. If you don’t have pipe cleaners, cut off the bendy end of two straws
and insert (if you don’t have bendy straws, just cut two small pieces off a
straw).
Step 3:
Glue google eyes to the front so the caterpillar can see! (If you don’t have
google eyes, use a black marker to draw eyes onto a piece of white paper. Cut
out and glue on.)
Step 4:
Decorate your caterpillar with markers or paint.
Step 5: Leave
your caterpillar in the window or in a large house plant.
Step 6:
Send us a photo!
See you
tomorrow for our weekly field trip!
Spring Do-At-Home ART Kits!
We’re putting together a set of all new ART supplies to keep your kids busily creating ART. No-contact pick-up scheduled for Monday, 10:00-11:30. Delivery also available to LP/Lakeview addresses. (Please note: Delivery charge will apply to each ART Kit, due to the way the system is set up; we will refund all but one $5 delivery fee for those who order delivery.) Click Here to Order!
Wednesday,
3/25/2020
One of the
things that makes The Paintbrush a unique place to learn about ART is that we
always have music playing. We carefully choose each week’s music to pair with
our ART projects.
Today we are
going to create art with music. MUSIC DOODLES!
Gather Supplies: Black marker (Sharpie is ideal, but remember, it’s not
washable), crayons or markers or water color paints, watercolor paper or any
paper you have (construction, printer, etc.), tape, MUSIC of your choice.
Step 1: Tape
your paper to the table so it doesn’t move.
Step 2: Turn
on your favorite music. We like Classical music for this project but listen to
whatever inspires you!).
Step 3: Pick up
your black marker.
Step 4: Close
your eyes and listen to the music.
Step 5: With
your eyes still closed, bring your marker to the paper and let the marker glide
around the paper as if it were dancing to the music. Do you feel swirls? Do you
feel sharp movements Continue for about one minute.
Step 6: Open
your eyes and look at your doodle! Does it look like you thought it would look?
Step 7: Use
your crayons or markers or water color paints to color in the spaces between
the marker lines.
Step 8: Famous
ARTists often give their ART a title. What’s the title of the ART you just
created? Maybe it’s the same name as the music you listened to. Maybe its title
is simply Abstract #1. Do you know what ABSTRACT ART is? It’s ART that
doesn’t represent anything you can specifically identify. Often ARTists give their
abstract
Tuesday, 3/24/2020
We got all
messy-crazy with the Paper Mache yesterday! Hope you had fun! You’ll likely be
finishing up the project today with the last steps of painting and decorating.
Use your pompoms and sequins from your Do-At-Home ART Kit to embellish your
project.
Today we’re
keeping it simple:
By now you’ve
probably amassed a collection of recyclables. Let’s pull a few cans from the recycling
bin and make pencil holders. Use the ones that had a pull-top; these are less likely
to have sharp edges.
Gather
supplies: Aluminum cans, pencil, scissors, ruler construction paper (or printer
paper if that’s what you have on hand), markers or crayons, glue, a rubber band.
Be sure
your can is clean and dry.
If the
label is still on, this makes this project easier. Carefully peel off label;
try not to rip it too much. Use the label as a template to cut your construction
paper to fit around your can. If you don’t have the label that’s ok. Lay the
can down and make a mark and a line with the ruler on the paper to guide you. Cut
the paper.
Use
markers or crayons to decorate the strip of paper. If you “mess up,” don’t
waste paper! Just turn it over and start again. Or, use your “oops” to create
something different from what you’d planned!
When you
are satisfied with your drawing, cover the outside of the can with glue.
Wrap your
drawing around the can.
Attach the
rubber band around your drawing to hold it in place while it dries.
Fill with
pens, pencils, and/or markers. Display your useful art proudly.
This
project makes a great gift!
Monday, 3/23/2020
Did you enjoy your visit to the Louvre in Paris? Miss Melanie and her boys took the visit (maybe we were there at the same time you were!) and the visit sparked conversation, memories of the 5th grade Egyptian Wax Museum at Lincoln Elementary, and ideas (model magic and papier maché came to mind). We even got a short history lesson from Hayden (Miss Melanie and Alec were not good students.) We took a look at another look at museums to visit. Keep up with us this week and see where we are going on Friday! You’ll love it!
Awhile back the mom of one of our Master ARTists asked about paper maché. So let’s do it!
Paper Maché can be used to make lots
of different things. How many of you parents remember making your own birthday
party pinatas as a kid? (No? Too young? Ask your parents if THEY remember!) The
basic idea behind paper maché is to create a solid sculpture. (Your kids are
going to love the bit of science here as they watch a liquid mess turn into a
solid!)
Gather supplies: newspaper, toilet paper/paper towel rolls, masking tape, boxes from food, pop bottle. Or just a balloon. More newspaper, paper towels or white printer paper, water, flour, measuring cup, mixing bowl, spoon. Paint (tempera is best; acrylic is great too but only
for big kids because it’s not washable).
Let’s make an animal. First we need to create the structure
of the body.
Here’s an example:
Use a round oatmeal container or 2-liter pop bottle for
a body. Attach toilet paper rolls with masking tape to create legs and a neck.
Ball up few sheets of newspaper to make a head. Attach with masking tape. Use
card board to make ears and a tail. What animal did you make? I made a big pink
elephant with flowers all over it when I was in 8th grade. If it’s
still in my mom’s basement I will post it on Insta!
Simpler version using a balloon: Blow up balloon. Set
aside.
How to Paper Mache
- Step 1: Cover your workspace with newspaper.
- Step 2: Tear newspaper into strips (if you don’t get the daily paper, check for a RedEye at the corner, or use old magazines.
- Step 3: Make paper maché paste:
- Recipe 1: 1 part white glue to 1 part water (if mixture is too thick, add a little more water; if too thin, add a little more glue)
- Recipe 2: 1 part flour to 1 part water. Mix until smooth (a few lumps are ok).
- Hint: Explain to your kids how you are measuring. Let them do the pouring and mixing.
- Step 4: One at a time dip your newspaper strips into your paper maché. Pull the strips gently through your fingers to smooth off excess paper maché from the strips.
- Cover your animal with strips, making sure to smooth as you go. Layer as if you were collaging. Bend around curves and make sure you cover every part completely.
- If using just the balloon, cover the entire balloon with strips. Leave a small area uncovered around the tied end, so you can pop the balloon and pull it out later after completely dry.
- Step 5: Let dry completely. This probably means that you will come back to this tomorrow.
- Step 6: Clean up! Everyone who worked on the project cleans up the project! Clean-up is an important part of the process.
- Step 7: Cover your work space with newspaper again.
- Step 8: When your animal (or your balloon ball) is completely dry, use tempera paints (or acrylics for older kids) to paint it. Get creative. We all know that elephants are grey but I painted mine pink and added flowers. Paint it to match your room!
- Step 9: Send us a photo and we will post it on Insta and fb! Post it yourself and remember to tag @thepaintbrush_artstudio
We hope
you’re having fun! Please text (773.636.1968) or email ThePaintbrush@ThePaintbrush.net
if you have any questions or suggestions.
Sunday, 3/22/2020
Order your kids’ ARTsy Easter Basket for Easter Eve no-contact delivery! Quantities are limited; reserve yours now!
Saturday, 3/20/2020
Happy Saturday! It’s ORANGE DAY! We’ve survived our first week at home. Hope our ART adventures have helped you and your kids to stay in a creative mood.
Just a few quick notes today:
–Thank you to everyone who ordered Do-At-Home ART Kits and St. Patrick’s Day Goody Bags this week. Your kindness and support, your waves thru the window, your adorable photos and your heartfelt words are going a LONG way over here.
–We have 2 Do-At-Home ART Kits still available for no-contact pick-up or LP/Lakeview no-contact delivery.Text 773.636.1968 to claim these.
–Easter is coming and we will likely still be home-bound. If you’d be interested in having an Easter basket of art-based goodies for your child please text Easter Basket to 773.636.1968 (No commitment at this point! Just gauging interest so we can look into putting these together for you.)
–If you registered for the Easter Egg Decorating Workshop on April 5, we will contact you separately.
Considerclicking here to purchase a GC good toward anything you want to come to the studio for in the future! Want to help us stay afloat while all this is happening? Texting 773.636.1968 to request a payment link to make a contribution toward helping us continue to bring you fun art at home now and in the studio in the (hopefully near) future. THANK YOU! So many fun ideas!Click to see all of our Do-At-Home ART Experiences!
If you’re not interested in receiving updates for fun things to do with your kids, please be kind. Our admin is working hard to stay above water during this extremely difficult time. The “unsubscribe” button is at the very bottom of this email right under the address and 3 lines above the words Constant Contact.
Take a photo of your art and send it to us at 773.636.1968 or
Friday, 3/20/2020 We’re Going to Paris!
Today we’re going to visit one of the most famous ART
Museums in the world: The Louvre in Paris, France. We like to look at our World
Map here at The Paintbrush to see where our artist-of-the-week is from. If you
have a globe or a world map at home, help your kids locate France. (If you don’t
have a map, you can find one at https://geology.com/world/world-map.shtml.)
Then help your kids locate Chicago. Ask your kids if Chicago and Paris are
close to each other or far apart. Ask them how they think we could get to
France if we wanted to visit. Do your kids know what language people in France
speak?
Click https://www.louvre.fr/en/visites-en-ligne
to take a magic trip (no airplane or ship needed!) to the Louvre! You can go also
go straight to the section called “Through Children’s
Eyes” by clicking here:https://www.louvre.fr/en/through-childrens-eyes
In these short videos, Louvre experts answer the
questions of pupils from ages 5 to 11 about the museum and its artworks. This
series is aimed at educators and art enthusiasts of all ages.
While you’re on your tour, look for ART that really stands out to you and your
kids. At The Paintbrush we are often inspired by works of ART that we see
during our own visits to ART museums. We create our studio projects from this
inspiration. What are you inspired to create based on your visit to The Louvre
today?
Thursday, 3/19/2020
Do-At-Home ART Kits Available TODAY!
Packed with canvas, construction paper, markers, crayons, scissors, glue stick, water color paper, watercolors with brush, pipe cleaners, pop poms, paper sacks, collaging squares, sequins, fun tape, googly eyes, play foam, disposable apron, and fun tips. Click to order $40 each No-Contact Pick-Up TODAY 5:00-6:00pm Add a t-shirt for $10. Add Delivery (Lincoln Park and Lakeview only, please) for $5.
Thursday, 3/19/2020
Fun Tips from The Paintbrush
It’s PURPLE DAY! Are you wearing PURPLE? Send us a photo!
Yesterday we gave you a list of at-home supplies and a few
ideas what to do with them.
Picking up where we left off yesterday, here are a few more
ideas to keep your kids creating!
Fun Tip #6: Big kids can use
these supplies to create a Recycled Robot:
- floppy discs
- cereal boxes (and
other food packaging) - Paper towel rolls
- Tape (colored tape is
fun!)
Fun Tip #7: Little kids can enjoy a sensory experience with Shaving Cream!
After you’ve dressed your tot in the smock we
made from Dad’s old undershirt yesterday, strap them into their high chair or
booster.
Fill a metal baking pan with shaving cream and
let your kids pop their hands in to play. Draw with your fingers.
Make a shaving cream snowman.
If you happen to have LOTS of shaving cream on
hand and you’re VERY BRAVE:
Dig out your little one’s bathing suit and let
them play in a bathtub full of shaving cream.
Fun Tip #8: Cookie cutters, construction paper, scissors, marker.
Fold construction paper in half and then in
half again. Cut paper into quarters.
Trace cookie cutter shapes onto each small
piece of construction paper.
Kids can practice their fine motor skills by
carefully cutting out the shapes you traced.
This will be hard. Don’t expect perfection. A
good effort is worth a pat on the back.
Make a collage with your cut-outs.
Always supervise your tots when they are
exploring art.
Remind them to keep supplies out of their mouth.
Get ready for tomorrow’s adventure! We’re
going on a virtual field trip!
Let us know what you think! If you like these
and want to see more please consider clicking here to purchase a GC good toward anything you want to come to
the studio for in the future, or texting 773.636.1968 to request a payment link
to make a contribution toward helping us continue to bring you fun art at home
now and in the studio in the (hopefully near) future.
THANK
YOU!
Take a photo of your art and send it to us at 773.636.1968 or thepaintbrush@thepaintbrush.net, and/or post it on social media and tag us
Wednesday, 3/18/2020
Pro Tips from The Paintbrush
THANK YOU to all who stopped by yesterday to pick up your St. Patrick’s Day goody bags. We sincerely appreciate your love, kind, words, and support. Extra thanks to those who added “a little extra” to your payments, and to those who posted photos of your adorable (!!!) kids for us! Together (but socially distanced, of course!) we will all get thru this!
We’re working on a plan to get you all some art supplies. While we figure out the logistics to do this safely, today we are going to help you get ready to do art at home with what you have.
Pro Tip #1: Kids are messy. Use one of dad’s old undershirts as a smock. Make it even more fun by letting kids decorate it first either with fabric paints or sharpies (these won’t wash out).
Pro Tip #2: Keep little kids contained while creating art by strapping them into their high chair or booster seat for their art time. This keeps the kids from massing up anything but their immediate area.
Here is a list of ordinary household supplies that make great art experiences:· Coffee filters· Paper towel and toilet paper rolls (we know you will have a LOT of those soon. Look for an upcoming email with ideas!)· Shaving cream· Old books & magazines· floppy discs· cereal boxes (and other food packaging)· flour or rice· salt· spray bottles· hole punch· Cookie cutters· Yarn/string· Muffin tins· Cotton balls· Q-tips
Now here are some very quick ideas to get your creative juices flowing:
Fun Tip #1: Dress in the rainbow! Yesterday was St. Patrick’s Day so we were all dressed in Green! Next to green is BLUE! We are dressed in BLUE today (all the way down to our socks!). Thursday will be PURPLE day. Friday will be RED day. Saturday will be ORANGE day. Sunday will be YELLOW day. Take a photo of your kids each day. Print out the photos and create a rainbow of photos on your kids’ bedroom or playroom wall, or put photos together to create a book (construction paper cover, staples for spine), or use as color flash cards. Post your photos on social media and tag us or send them us to do so!
Fun Tip #2: Use markers or water color paints to paint coffee filters. If using markers, fill a spray bottle with water and squirt the filter lightly to watch the colors run. When dry, punch a hole with your hold puncher and string yarn through the hole. Hang in your window. Watch the floor on sunny days to see if you can find a rainbow.
Fun Tip #3: Help tots practice fine motor skills: Place a cotton ball (or a few) in 3 spaces of a 12-space muffin tin. Show your tot how to use a spoon to move the cotton balls to the next row of three spaces. Can they move them, one space at a time, to the end? OLDER KIDS can sit across from each other and race across the muffin tin!
Fun Tip #4: Cover your table with newspaper or a washable table cloth. Spring a generous portion of flour or rice into a cookie baking sheet. Show your kids how to use their fingers to “draw” pictures. This is a great way to learn shapes and numbers and letters. When finished, gently transfer to a large ziplock bag and save for another day.
Fun Tip #5: If you have any type of paint at home (water colors or temperas) try painting with cotton balls and Q-tips. Your older artist may want to learn about pointillism. Look up this term with them. Use a pencil to draw out a picture. Then paint with Q-tips using only primary colors (red, blue, yellow) and white paint. To make secondary colors, paint two primary colors next to each other. Try to fill your WHOLE paper. Stand back and take a look. Kids who have attended camp with Miss Melanie might remember doing this project!
So many fun ideas!Click to see all of our Do-At-Home ART Experiences!
We will post more tomorrow.
Let us know what you think! If you like these and want to see more please consider clicking here to purchase a GC good toward anything you want to come to the studio for in the future, or texting 773.636.1968 to request a payment link to make a contribution toward helping us continue to bring you fun art at home now and in the studio in the (hopefully near) future.
THANK YOU!
Tuesday, 3/17/2020 Happy St. Patrick’s Day!
If you were one of the lucky 50 kids to pick up a St. Patrick’s Day goody bag this morning, we would love to see a photo of you stringing or wearing your St. Patrick’s Day necklace. If you weren’t able to go out today, don’t fret!
Here’s a project you can do with supplies you have at home.
St. Patrick’s Day Rainbow teaches kids the order of the colors of the rainbow, and encourages fine motor coordination through cutting, coloring and gluing.
Supplies Needed: paper plate, scissors, markers or crayons or colored pencils (or watercolors), glue/glue stick, cotton balls, black and yellow construction paper (optional)
What To Do: Help your kids cut the paper plate in half. You’ll only use one half (unless you want to make 2 rainbows!)Using your crayons/markers/pencils/paints create the rainbow staring at the outer edge of the plate. Color with red first, followed by orange, yellow, green, blue and purple, in that order.Glue a puffy handful of cotton balls to one end of the rainbow.If you have black and yellow construction paper, do the following: Cut out a black pot (looks like a cauldron) and a few small yellow circles (us a pencil to trace a nickel to get circles of a good size). Make the pot of gold at the end of the rainbow: Glue the pot to the opposite end of the rainbow from the cotton balls clouds. Glue your yellow circles to the top of the black pot.If you DON’T have black and yellow construction paper (or anything else you can cut to make these), add another generous portion of cotton balls to both ends of your rainbow.
Take a photo of your art and send it to us at 773.636.1968 or thepaintbrush@thepaintbrush.net, and/or post it on social media and tag The Paintbrush.
3/16/2020 Favorite Things Collage is one of our favorite simple do-at-home projects.
Supplies Needed: old magazines, scissors, paper (construction, printer, brown bag, whatever you have)glue/glue stick, crayons or markers
What To Do: Help your kids look thru your magazines to find and cut out pictures of their favorite things. You may pick a theme, such as flowers or animals or letters, or just let them choose pictures that they like. Words are fun to cut out too (for older kids who can read). Tots under 3 will need your help but kids 3 and up should try doing their own cutting. Doesn’t have to be perfect!
St. Patrick’s Day twist #1: Help your kids find pictures only of things that are GREEN!
Glue the cut-outs to your paper. Remember our glue rule: “A dot is a lot.” That means a little glue goes a long way.
Use crayons or markers to fill in any space between cut-outs.
St. Patrick’s Day twist #2: Make the rainbow!Find pictures from every color in the rainbow and either help your child glue them to their paper to create a rainbow, or for little kids glue each set of pictures to separate, smaller pieces of paper. String together or tape together in the color order of the rainbow (red, orange, yellow, green, blue, purple).
Take a photo of your project, post it on social media and tag us! Or send it to us directly via text 773.636.1968 or email ThePaintbrush@ThePaintbrush.net